TROUBLESHOOTING SOLUTIONS: ELECTRICAL PROBLEMS
Electrical problems are problems with either the design or construction of your electrical circuits. These are physical problems that you’ll need to fix by hand with scissors, a needle, thread, fabric, and glue. The next several pages provide examples of common electrical problems, information about how to find them, and step-by-step instructions for fixing them.
ELECTRICAL PROBLEMS COVERED IN THIS SECTION
• loose connections
• short circuits
• reversed polarity
LOOSE CONNECTIONS
Loose connections occur when the thread that is stitched through a component (like an LED, speaker, LilyTiny, or Protoboard) is too loose. If the thread is too loose, there will not be a consistent electrical connection between the thread and the component. To carry electricity through the circuit, the thread must be tightly pressed up against the silver holes in the component. Loose connections can be caused by loose stitching or unravelling knots. If a knot is not secured with glue, it can come undone, loosening the connections near it.
symptoms
If there is a loose connection in your project, parts of your project will only work some of the time. For example, if there is a loose connection between your LED and your battery board in the bookmark project, your LED may flicker on and off or only work some of the time.
checking your project for loose connections
Gently bend and stretch your project. If this causes your LED to turn on and off, it is likely that you have a loose connection. To find loose connections, look carefully at the connections between your thread and your components. Make sure each connection is snug and tight. If you find a loose thread around any tab, or an unravelling knot, you’ll need to fix it.
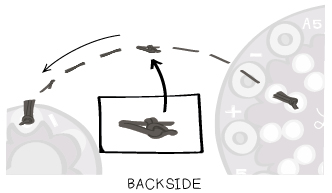
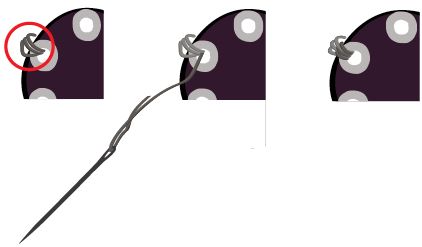
FIX LOOSE CONNECTIONS
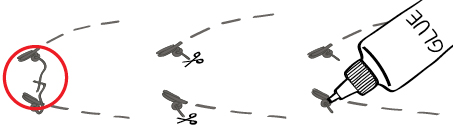
To fix loose connections, thread your needle with conductive thread. From the back or underside of the fabric, push your needle up through the tab with the loose connection. Loop through the tab a few times. Make sure your thread is touching the original stitches you sewed in several places. Push the needle to the back or underside of the fabric. Tie a snug knot, making sure that the new thread is pulled tightly against the tab and the old stitching.
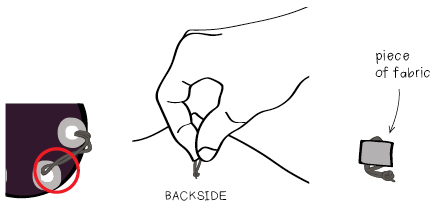
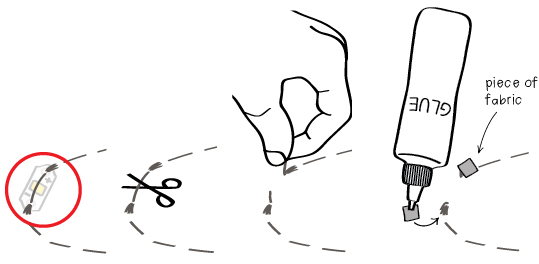
If you have a knot that is unravelling, find the end of the thread and pull on it to re-tighten connections. Cut out a small piece of fabric and glue it down over the unravelling thread. You will also need to resew stitches that have come undone. Make sure that your new thread touches the existing thread in several places to make a solid electrical connection.

SHORT CIRCUITS
Short circuits or “shorts” happen when two threads that should not touch one another come into contact. Power (+) and ground (-) traces in a circuit should never touch one another. More generally, traces connected to different tabs on a Protoboard, LilyTiny, or other component should never touch one another. It is OK for traces connected to the same tab to touch each other. For instance, all of the threads attached to the ground (-) tab can touch each other, but thread attached to tab 9 should never touch thread attached to the ground (-) tab.
Causes of shorts include: long knot tails that brush up against each other, stitches from two different tabs that cross each other, stitching that continues from the (+) tab of a component to the (-) tab of the same component (That is, you forgot to stop and tie a knot after stitching through one of its tabs.), and loose thread around a tab that brushes against a neighboring tab. Each of these problems is covered in more detail later in this section.
symptoms
If there is a short circuit in your project, parts of your project either will not work or will only work some of the time. For example, if you have sewn across your LED in the bookmark or monster project, forgetting to stop your stitching after the (+) or (-) tab, your LED will not work. If you left long knot tails dangling behind your speaker in the monster project, the speaker will stop working whenever the tails brush up against one another. This will result in a speaker that works some of the time but not others.
checking your project for short circuits
To find shorts, follow each trace in your project looking for the problems described in this section. Check all of your knot tails to make sure that they can’t touch other traces, make sure that none of your traces cross or touch other traces, make sure that you have not sewn across any of your components, and, make sure that there are no loose threads that may touch other traces or tabs.
FIX SHORT CIRCUITS
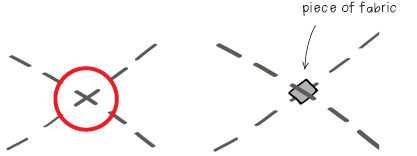
Loose thread touching another pin or trace: From the back of your fabric (if possible), pull on the loose thread until it is gathered in one spot. Cut out a small piece of fabric and glue it down over the extra thread, making sure that the extra thread is not touching any neighboring traces or tabs.
Stitching across a component: If you have accidentally sewn the (+) side of a component to the (-) side of a component, you will need to cut the thread that is connecting the two tabs. You will be left with two very short threads. Tug on each thread tightly, move it away from the other thread, and glue it down with a small piece of fabric.
Knot tails touching: To eliminate long knot tails, trim them down to 1/4” (6mm) or shorter. Seal them with glue so that they do not come unravelled. Make sure that the tails cannot brush up against any neighboring traces. You can also glue a small piece of fabric down over your knot tails to keep them from unravelling and touching other traces.
Overlapping stitches: If there is an area in your project where two traces cross each other and come into contact, separate the two traces with a small piece of fabric. Slide the piece of fabric underneath one set of stitches and on top of the other to keep them apart. Glue the fabric in between the two threads so that they cannot touch one another.
REVERSED POLARITY
When you stitch the (+) side of a component to the (-) side of a battery (or the (-) tab of your Protoboard), and the (-) side of a component to the (+) side of a battery (or one of the numbered tabs on your Protoboard), you have connected it backwards and it will not work. Electricity will only flow through most components in one direction—from the (+) to the (-) side of a component. Examples of reversed polarity are described below.
symptoms
If one of your components is sewn in backwards, it will not work at all. For instance, if you’ve sewn your LED on backwards in the bookmark project it will not turn on.
checking your project for reversed polarity
To find instances of reversed polarity, look carefully at each component in your project. Make sure that each component’s (-) tab is stitched to a matching (-) tab on the battery holder, LilyTiny, or Protoboard. Similarly, make sure that each component’s (+) tab is sewn where it should be—to the (+) tab on a battery holder or one of the numbered tabs on the LilyTiny or Protoboard.
FIX REVERSED POLARITY
Unfortunately there’s no easy way to fix instances of reversed polarity. To correct this problem you need to remove the component and reattach it in the correct orientation. You’ll need to cut your stitches to remove the component. Once you’ve removed the component, glue it back on in the correct orientation. Make sure you get it right this time!
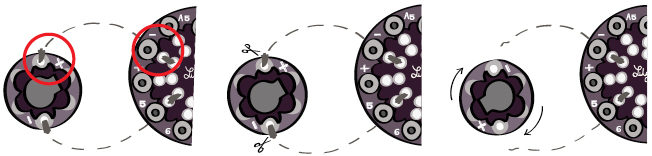
Thread your needle with conductive thread. Begin with the (-) trace. On the back or underside of the fabric (if possible), tie your new thread to the old stitching on the (-) trace. Sew toward the reattached component. Make sure your new thread is touching the original stitches in several places. Stitch through the (-) tab of the component several times. Tie a knot on the underside of your fabric, trim its tails, and seal it with a dab of glue. Repeat the same process for the (+) tab of your component.