DETECT KEY PRESSES
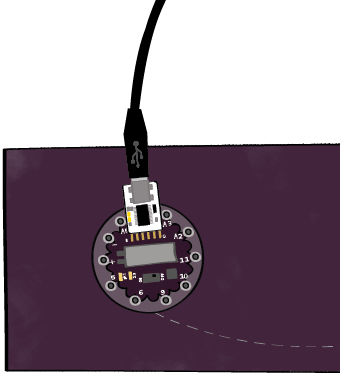
Get out your computer, open up the Arduino software, and attach your LilyPad Arduino SimpleSnap to your computer using the USB cable and FTDI board. Snap the LilyPad onto the Protoboard.
SEND DATA FROM THE LILYPAD TO THE COMPUTER
Open up a blank Arduino program by clicking on File→New. Add the basic setup and loop sections to this program. Compile the program to make sure you haven’t made any punctuation errors.
void setup() {

}

void loop() {

}
Now you’ll write a program to send information from your LilyPad to your computer. Add one line to the setup section and two lines to the loop section. Recall that the setup section runs once when the program starts, and then the loop section runs over and over until the LilyPad is turned off or reprogrammed.
void setup() {
    Serial.begin(9600);    // initialize the communication
}

void loop() {
    Serial.println("hey"); // send the word “hey” to the computer
    delay(100);            // delay for 1/10 of a second
}
The lines you’ve added should be familiar to you from the monster tutorial. The line Serial.begin(9600); initializes the communication between the LilyPad and the computer, telling the computer how fast the LilyPad is communicating (9600 bits per second, the standard Arduino speed).
The line Serial.println(“hey”); sends the message “hey” to the computer. With the line delay(100);, you’re pausing for 1/10 of a second so that you will not overload the computer by sending it too much data too quickly. Notice how comments here describe what each line does. You may want to add these comments to your code for reference.
Upload this code to your LilyPad. If you encounter compile errors, read through your code carefully to make sure it matches the example. Look especially for missing or misplaced parentheses “(“ “)”, brackets “{“ “}”, and semicolons “;”. Also remember that code is case-sensitive. If you are still having problems, see the troubleshooting chart on page xxx of the programming tutorial.
Once the code is successfully uploaded, click on the magnifying glass icon in the upper right hand corner of the Arduino window to open the Serial Monitor. You should see a steady stream of “hey”s.


THE POWER OF OPEN SOURCE
Now you’ll write the touch sensing part of your program to detect when your key is touched. Then you can send that information to the computer instead of “hey”.
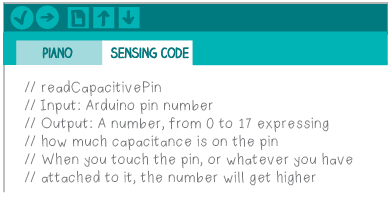
To detect whether a key is being touched or not, you’ll use a procedure called readCapacitivePin. You’re not going to write this procedure. Instead, you’re going to use an open source procedure that was written by Mario Becker and Alan Chatham and posted online. Copy the code from this web page: capacitive sensing code
Now you’ll create a new tab in your Arduino program to store this code. Click on the downward pointing arrow directly below the magnifying glass icon in the toolbar. On the menu that pops up, select “New Tab”.

You will be prompted to enter a name for the tab. Call it “sensing-Code” or something that makes sense to you. Paste the code you’ve copied from the website into this tab.
Tabs help you keep long programs organized. Instead of keeping the code you just copied in your main program, you can keep it in its own tab. If you want to look at it or edit it you can click on that tab. Meanwhile, your main program stays simple and short.
The code you copied is long and complicated! But, don’t worry. You don’t have to understand the details of how it works to use it. It consists mainly of a procedure called readCapacitivePin. You’ve explored procedures in earlier tutorials. Here, you’re encountering another one of the reasons that they are powerful and useful. You can share them! Moreover, you don’t have to understand how they work to use them. To use a procedure you only need to know four things about it:
1. Its name.
2. What it requires as input.
3. What it produces as output.
4. What it does.

The readCapacitivePin procedure you just downloaded works as follows:
1. Procedure name: The name is readCapacitivePin.
2. The input: The input is the number of the pin you want to turn into a sensor—the pin that your piano key is connected to.
3. The output: The procedure will return a number between 1 and 17 to indicate how hard the sensor is being touched. In your project, a 0 or 1 means that the key is not being touched and anything greater than 1 means the key is being touched.
4. What it does: This procedure uses an electrical property called capacitance to determine whether or not a person is touching a pin. (You’ll learn more about capacitance in a few pages.)
Generally, procedures allow you to use a functionality without knowing how that functionality is implemented. In computer science, this idea is called abstraction—that is, you abstract away the details of how a procedure is written and instead focus on what it does. You can use the procedure without knowing exactly how it works.
If you think about it, you can find abstraction everywhere. People use lots of things without knowing how they work. You don’t need to know what goes on inside a television in order to watch it; you don’t need to know how to build a car in order to drive it; and you don’t need to know how to make paper in order to sketch on it.
In the programming arena, abstraction allows people to write more complicated programs than they could write on their own. People can collaborate just by sharing code, without ever meeting one another. Now you’re collaborating with Mario and Alan. It’s code sharing and abstraction that let large groups of people cooperatively build massive and complex systems like the Internet.
Save your code by clicking on the downward pointing arrow in the Arduino software. Choose an appropriate name for your program like “Piano”. Return to the main tab of your program—the tab labelled with the name of your program—by clicking on that tab.

WRITE A PROGRAM TO DETECT TOUCH
Now you’ll explore what kinds of values the readCapacitivePin procedure returns. To do that, you need to call the procedure and then send the values it returns to the computer where you can see them in the Serial Monitor. You’ll make a few additions to your code to accomplish this task.
First, add two variables to your code. At the beginning of your program, create a variable called key1 and set its value to 6. This gives the name key1 to the pin that your first piano key is attached to. Create a second variable called touchValue. This variable will store the readings that you take from your sensor.
In the setup section of your code, set key1 to be an input. This tells the LilyPad that an input (in this case a touch sensor) will be attached to the key1 pin. Compile and upload this code to make sure you haven’t introduced any errors.
int key1 = 6;               // name of the first sensor key
int touchValue;             // will store sensor readings

void setup() {
    pinMode(key1, INPUT);   // set key1 to be an input
    Serial.begin(9600);     // initialize the communication
}

// the loop routine runs over and over again forever:
void loop() {
    Serial.println("hey");  // send the word “hey” to the computer
    delay(100);             // delay for 1/10 of a second
}
Note: The behavior of the code won’t change yet since you haven’t added any new statements to the loop section.
Now add the following line of code to the beginning of the loop section: touchValue = readCapacitivePin(key1); This new line makes use of the readCapacitivePin procedure. You’re using key1 as the procedure’s input—that’s your touch sensing key—and you’re storing the value returned by readCapacitivePin in the variable touchValue. Here’s what the line looks like when broken down:

You also want to send the value that you read from your sensor, touchValue, back to the computer. Change the Serial.println statement so that instead of sending “hey” back to the computer you send touchValue. Also, update all of the comments in your program so that they accurately describe what each line of code is doing.
int key1 = 6;                             // name of the first sensor key
int touchValue;                           // will store sensor readings

void setup() {
    pinMode(key1, INPUT);                 // set key1 to be an input
    Serial.begin(9600);                   // initialize the communication
}

void loop() {
    touchValue = readCapacitivePin(key1); // read the touch sensor value
    Serial.println(touchValue);           // send touchValue to the computer
    delay(100);                           // delay for 1/10 of a second
}
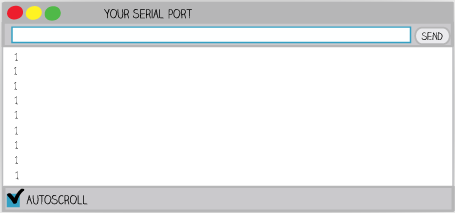
Compile your code and upload it to your LilyPad. Open up your Serial Monitor. When you are not touching the key, a stream of 1’s should appear in the Serial Monitor.
Now touch the key. Do the numbers change? If so, how?
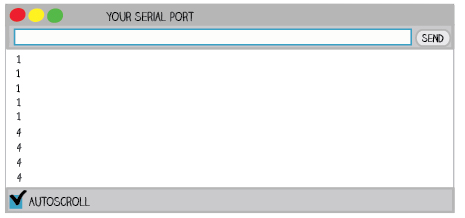
The Serial Monitor here shows that the statement readCapacitivePin(key1); outputs the value 1 when no one is touching the key, and 2 or higher when someone is touching the key.
If your values are changing when you touch your key, you can move on to the next section. If they aren’t changing, first carefully review your code to make sure it matches the example here. If you’re still having problems, see the troubleshooting section.
HOW DOES THE TOUCH SENSOR WORK?
Before you go on, it’s worth exploring how the sensor you just made works.
As was mentioned before, it’s different from the sensor you built in the monster tutorial. That touch sensor required two points of contact—you had to hold onto the monster with both hands, one hand on each conductive paw—for it to work. What’s cool and useful about the sensor you just built is that it requires only one point of contact. You only need to touch one conductive area for it to trigger; you only need to use one hand.
The method of touch sensing you’re using for the piano key is called capacitive sensing—a simplified version of the same method that a touch-screen phone or tablet uses to detect your gestures.
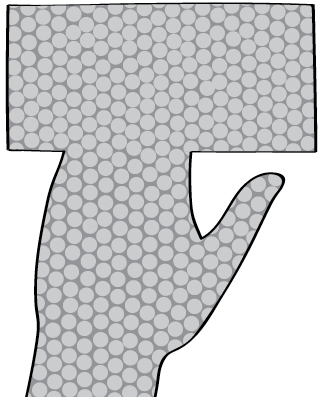
Capacitive sensing takes advantage of the electrical properties of the human body. All conductive materials (like conductive thread, aluminum foil, copper wire, and the human body) have capacitance, meaning that they can store electric charge. Imagine little bits of electric charge filling up a conductive area like the one below. Think of each circle as a bit of charge.

Each conductive material has a certain capacity to store electric charge, hence the name capacitance. When you touch a conductive material, you increase the amount of electric charge that it can store because the amount of material that is available to store charge increases—see the diagram below. When you touch a conductive material, its ability to store charge increases. In other words, its capacitance increases.
The readCapacitivePin procedure tells you how much capacitance the conductive material attached to a pin has. Since the capacitance changes when you touch the pin, it can detect your touch.