CONDENSE YOUR CODE WITH ARRAYS
If you look at the current version of the code, you’ll notice a couple of places where similar statements occur several times in a row. For instance, in loop, you call the checkPianoKey procedure seven times in a row, once for each key.
void loop() {
    checkPianoKey(key1, 1046);     // play a C
    checkPianoKey(key2, 1175);     // play a D
    checkPianoKey(key3, 1319);     // play a E
    checkPianoKey(key4, 1568);     // play a G
    checkPianoKey(key5, 1760);     // play a A
    checkPianoKey(key6, 2093);     // play a C
    checkPianoKey(key7, 2349);     // play a D
    Serial.println();
    delay(100);
}
Wouldn’t it be nice to be able to condense these lines? To tell the computer that you want to do the same basic thing (call the procedure checkPianoKey) seven times in a row, with seven different sets of variables as input?
To accomplish this, it would be useful to have a way to store collections of data. That way you could tell the computer to do checkPianoKey for each element in the collection. One collection could store all of the key information and another could store all of the note information. Essentially, you’d like a way to create a list or table of values, something like this:

Then you could say something like the following:
do the following 7 times:
    checkPianoKey (key list entry1, notes list entry1);
    move to the next entry in both lists
ARRAYS: LISTS IN CODE
Arrays allow you to create structured collections of information in code. They’re essentially lists or tables in code. Now you’re going to create two arrays, one for your keys and one for your notes. To create an array of data, you need to tell the computer a few basic things. First, the type of data you’re going to be storing in your list, and second, how many elements there are in your list. The format for this statement is shown below.
int key1 = 6;
int key2 = 9;
int key3 = 10;
int key4 = 11;
int key5 = A2;
int key6 = A3;
int key7 = A4;
int keys[7] = { 6, 9, 10, 11, A2, A3, A4 };
This statement tells the computer to create an array named keys with places for seven [7] elements and then stores the seven key variables in the array.

You could make an array for your notes with the statement below:
int notes[7] = { C, D, E, G, A, C1, D1 };
Add array definitions for your keys and notes to the top of your code, in the variable declaration section. Notice that array declarations look kind of like variable declarations. Arrays are variables too. They’re just more complex variables than the simple ones you’ve seen so far. Arrays, like all variables, store information that you can use later on in your program. Compile your code to make sure you haven’t made any mistakes in your array definitions.
int key1 = 6;
int key2 = 9;
int key3 = 10;
int key4 = 11;
int key5 = A2;
int key6 = A3;
int key7 = A4;
int keys[7] = { key1, key2, key3, key4, key5, key6, key7 };

int speaker = 5;
int touchValue;

int C = 1046;
int D = 1175;
int E = 1319;
int F = 1397;
int G = 1598;
int A = 1760;
int B = 1976;
int C1 = 2093;
int D1 = 2349;
int notes[7] = { C, D, E, G, A, C1, D1 };
Before moving on it’s worth making a few adjustments. First, notice how you created variables for each key (key1, key2, key3, etc.) and then created the keys array. Well, you only need to do one of these things. You can condense the first section of your code by eliminating the key1, key2, key3, etc. variables and putting the pin numbers for your keys directly into your keys array, as shown below.
int key1 = 6;int key2 = 9;int key3 = 10;int key4 = 11;int key5 = A2;int key6 = A3;int key7 = A4;int keys[7] = { 6, 9, 10, 11, A2, A3, A4 };
You can do the same thing for your notes array. Edit your program so that the top of it looks like the code below. Notice how much shorter this is than the code you started with (shown above)!
Finally, notice how you’re using the number 7 in both of your array creation statements. This number corresponds to the number of keys on your piano. You can replace this number with an appropriately named variable. Add one more line to the top of your program, creating a new variable called numberOfKeys. Change your array creation statements to make use of it.
int keys[7] = { 6, 9, 10, 11, A2, A3, A4 };
int notes[7] = { 1046, 1175, 1319, 1598, 1760, 2093, 2349 };
int speaker = 5;
int touchValue;
const int numberOfKeys = 7;
int keys[numberOfKeys] = { 6, 9, 10, 11, A2, A3, A4 };
int notes[numberOfKeys] = { 1046, 1175, 1319, 1598, 1760, 2093, 2349 };

int speaker = 5;
int touchValue;
Note that you’re using const int as the data type for the numberOfKeys variable instead of int. This creates a constant variable. This means that the numberOfKeys variable will stay constant throughout the program. That is, it will not change. If you try to set numberOfKeys to some other value elsewhere in your code, you will get an error when you try to compile and upload your code to the LilyPad.
Now, you’ll use your arrays in the rest of your program. Your setup section currently looks like the code shown below, with seven pinMode statements for the seven piano keys.
void setup() {
    pinMode(speaker, OUTPUT);
    pinMode(key1, INPUT);
    pinMode(key2, INPUT);
    pinMode(key3, INPUT);
    pinMode(key4, INPUT);
    pinMode(key5, INPUT);
    pinMode(key6, INPUT);
    pinMode(key7, INPUT);
    Serial.begin(9600); // initialize the communication
}
You want to replace each pinMode(key, INPUT); statement with a statement that uses your new keys array. To do so, you need to know how to refer to different elements in the keys array. In the first pinMode statement you want to use the first element in your keys array (instead of key1). You want to say:
pinMode(1st element of keys array, INPUT);
There is a particular code format for accessing elements in an array. You use numbers enclosed in square brackets immediately following the name of the array:
keys[element number];
With computer code, the numbering is a little…strange. You might think that the first element in an array would be number 1, but it’s number 0 instead. Computer scientists start counting with the number 0 instead of the number 1. So, to access the first element in your keys array, you’d say:
keys[0]; //access first element in the keys array
To access the second element you’d say keys[1], the third, keys[2], and so on. So, the first pinMode statement should be: pinMode(keys[0], INPUT); Using this new information, you can rewrite your setup section so that it looks like the example shown below.
void setup() {
    pinMode(speaker, OUTPUT);
    pinMode(keys[0], INPUT);
    pinMode(keys[1], INPUT);
    pinMode(keys[2], INPUT);
    pinMode(keys[3], INPUT);
    pinMode(keys[4], INPUT);
    pinMode(keys[5], INPUT);
    pinMode(keys[6], INPUT);
    Serial.begin(9600); // initialize the communication
}
Now turn to the loop section of your program. The first line there looks like this:
checkPianoKey(key1, C);
Again, instead of using the key variables and frequency numbers, you can use your arrays. Here’s what a call to checkPianoKey that uses your keys and notes arrays looks like:
checkPianoKey(keys[0], notes[0]);
You can now replace all of the old calls to checkPianoKey in loop with calls that use your array as is shown below. Make this final change and try uploading the new code to your LilyPad. Before moving on, make sure that the code compiles and that your piano works nicely. Also open up the Serial Monitor and make sure that your printout still looks good.
void loop() {
    checkPianoKey(keys[0], notes[0]);
    checkPianoKey(keys[1], notes[1]);
    checkPianoKey(keys[2], notes[2]);
    checkPianoKey(keys[3], notes[3]);
    checkPianoKey(keys[4], notes[4]);
    checkPianoKey(keys[5], notes[5]);
    checkPianoKey(keys[6], notes[6]);
    Serial.println();
    delay(100);
}
CONDENSING THE CODE PART 2: WHILE LOOPS
You may have noticed that, though you’ve eliminated some variables at the top of your code, you haven’t really condensed the loop section. You’ll now face that challenge…
In your loop section, the calls to checkPianoKey now have a very clear pattern. Each statement is identical except that the numbers you are using to access your arrays increase by one for each line. They start at 0, then advance to 1, then 2, and so on.
You could rewrite the code to capture this pattern by introducing a variable called i and increasing it by one after each checkPianoKey statement. This example is shown below. (Note: don’t do this yet, just follow along for a moment)
//create a variable i and initialize it to 0
int i = 0;
checkPianoKey(keys[i], notes[i]); // i = 0
i = i+1;
checkPianoKey(keys[i], notes[i]); // i = 1
i = i+1;
checkPianoKey(keys[i], notes[i]); // i = 2
i = i+1;
checkPianoKey(keys[i], notes[i]); // i = 3
i = i+1;
checkPianoKey(keys[i], notes[i]); // i = 4
i = i+1;
...
i is initially 0. The first time checkPianoKey is called, the inputs will be keys[0] and notes[0], the second time it’s called the inputs will be keys[1] and notes[1] since the variable i is now 1 (i = 0+1). The third time it’s called, i will be 2 (i = 0+1+1), so the inputs will be keys[2] and notes[2]. You could repeat this pattern for all seven keys—that is, until i = 6 and the inputs are keys[6] and notes[6].
Notice how, in this example, every 2 line block after the statement int i = 0; is identical.
Rewriting the code this way would increase the number of lines of code in the loop section, which you don’t want to do. But, it reveals a very interesting pattern—the fact that, after the statement int i = 0;, two identical lines are repeated seven times.
Now, instead of copying out the same two lines seven times, could just tell the computer to repeat those lines seven times? You want to say something like the code shown below.
int i=0;
repeat 7 times:
{
    checkPianoKey(keys[i], notes[i]);
    i = i+1;
}
You can use a programming feature, called a while loop, to do this. The term while is used in programming pretty much the same way it is used in real life: “while a certain condition is true, do something.” For instance: “while it is raining, stay inside.” A while loop in ½ code ½ written English is shown below:
while (condition)
{
    /* Do what is inside the two curly brackets over and
    over, as long as the condition is true. Stop doing stuff
    only when the condition is not true */
}
A real while loop is shown here.
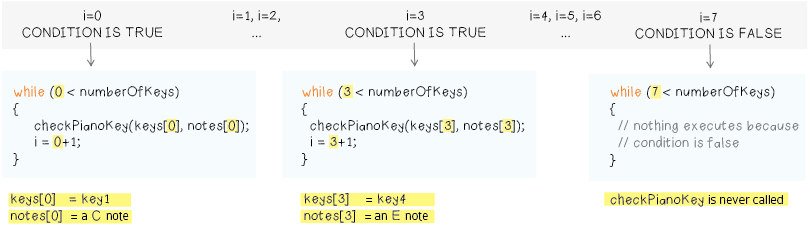
int i = 0;
while (i < numberOfKeys)
{
    checkPianoKey(keys[i], notes[i]);
    i = i+1;
}
This while loop says while the variable i is less than the numberOfKeys on your piano, do those two lines you were repeating over and over:
1. Call the checkPianoKey procedure with keys[i] and notes[i] as inputs.
2. Add 1 to the variable i.
This while loop will repeat until the condition (i < numberOfKeys) is false. Since the variable numberOfKeys is 7, the while loop will repeat 7 times. Three snapshots of the while loop execution are shown below, when i=0, when i=3, and when i=7.
(Click on the image below to see it bigger)
Add this new while loop to the loop section of your code, using it to replace the 7 calls to checkPianoKey. Try uploading it to your LilyPad. Your piano should work as it did before, but your program is a little shorter.
More importantly, this new program does a better job of describing what you want your piano to do. It captures information that is lost in the first program, relating the number of times you call checkPianoKey to the number of keys you have in your piano. This code is less error prone and easier to expand on if you wanted to add more keys.
OLD
void loop() {
checkPianoKey(keys[0], notes[0]);checkPianoKey(keys[1], notes[1 ]);checkPianoKey(keys[2], notes[2]);checkPianoKey(keys[3], notes[3]);checkPianoKey(keys[4], notes[4]);checkPianoKey(keys[5], notes[5]);checkPianoKey(keys[6], notes[6]);Serial.println(); delay(100); }
NEW
void loop() {
    int i = 0;
    while (i < numberOfKeys)
    {
        checkPianoKey(keys[i], notes[i]);
        i = i+1;
    }
    Serial.println();
    delay(100);
}
A close look at your entire program will reveal another spot where you can replace a large chunk of code with a shorter while loop. Hint: Take a look at the setup section. Can you replace the highlighted portion of code below with a while loop? (See the next page for the correct code.)
void setup() {
    // set all keys to be inputs
    pinMode(keys[0], INPUT);
    pinMode(keys[1], INPUT);
    pinMode(keys[2], INPUT);
    pinMode(keys[3], INPUT);
    pinMode(keys[4], INPUT);
    pinMode(keys[5], INPUT);
    pinMode(keys[6], INPUT);
    pinMode(speaker, OUTPUT);
    Serial.begin(9600);
}
EXPERIMENT
Try associating different notes (frequencies) with different piano keys. Can you get your fabric piano to play a standard scale like the one on a traditional piano? Can you get it to play a short tune when you run your fingers across the keys?
How might you change your code if you wanted to add additional piano keys?
SAVE YOUR CODE
Once you are happy with your program, save it by clicking on the downward pointing arrow in the Toolbar. Your entire program should now look more or less like the one below.
const int numberOfKeys = 7;
int keys[numberOfKeys] = { 6, 9, 10, 11, A2, A3, A4 };
int notes[numberOfKeys] = {1046, 1175, 1319, 1598, 1760, 2093, 2349};

int speaker = 5;                    // name of the speaker key
int touchValue;                     // will store sensor readings

void setup() {
    // set all keys to be inputs
    int i = 0;
    while (i < numberOfKeys)
    {
        pinMode(keys[i], INPUT);
        i = i+1;
    }
    pinMode(speaker, OUTPUT);       // set speaker to be an output
    Serial.begin(9600);             // initialize the communication
}

void loop() {
    int i = 0;
    while (i < numberOfKeys)
    {
        checkPianoKey(keys[i], notes[i]);
        i = i+1;
    }
    Serial.println();
    delay(100);
}

void checkPianoKey(int key, int note) {
    touchValue = readCapacitivePin(key); // read touch sensor value
    Serial.print(touchValue);            // send value to the computer
    Serial.print("\t");                  // send a tab
    if (touchValue > 1)                  // if the key is pressed
    {
        tone(speaker, note);             // play a note
        delay(100);                      // wait for 1/10th of a second
    }
    else                                 // if the key is not pressed
    {
        noTone(speaker);                 // stop playing the note
    }
}