THE LILYPAD ARDUINO SIMPLESNAP
THE BASICS
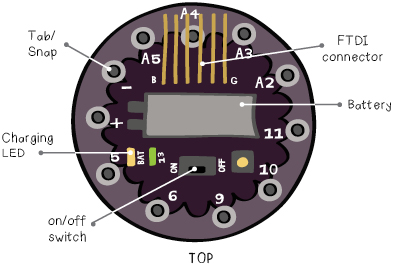
Before you start programming, it’s useful to know a few things about the LilyPad Arduino SimpleSnap—a small computer in a snap-on package. Take out your LilyPad board and take a close look at it. Note: We’ll also sometimes call the LilyPad a board, which is short for circuit board. The top side of the board has an on/off switch, a push button switch, a connector that will attach to your FTDI board, a battery, and two LED lights. There are also 11 silver circles on the edge of the board. As in previous tutorials, we’ll call these tabs. Notice how each tab has a label: +, -, 5, 6, 9, etc.
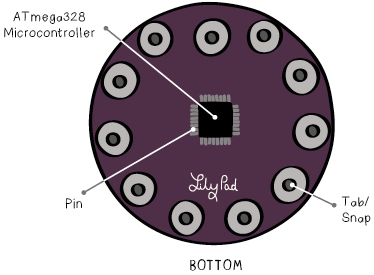
The bottom side of the LilyPad has a ring of snaps surrounding an assortment of electronics. Each snap is connected to one of the tabs on the top side of the board. The black square in the center of the board is a computer chip called a microcontroller. It’s similar to the microcontroller on the LilyTiny that you used in the Sparkle Bracelet tutorial. However, this microcontroller, an ATmega328, is larger and more powerful; notice how it has many more pins than the LilyTiny’s chip. Similarly, this chip stores programs and controls electronics that are connected to the LilyPad.
THE BATTERY
The LilyPad Arduino SimpleSnap has a built in rechargeable battery. This is the large silver block on the top of the board. When the LilyPad is plugged into your computer the battery will charge. An orange LED on the LilyPad will shine while the battery is charging. When the battery is fully charged this light will turn off.
NOT WASHABLE!
Because it has a built in battery, the LilyPad Arduino SimpleSnap is NOT WASHABLE! Snap it off of your project before washing your project in cold water with a gentle detergent.