MAKE READABLE PRINTOUTS
Begin this section by opening the Piano program you’ve been working on. If you haven’t already, snap your Lily-Pad SimpleSnap onto your piano and plug it into your computer. Compile and upload your Piano program.
In the Arduino software, click on the magnifying glass in the Arduino window to open the Serial Monitor. You should see a stream of numbers that correspond to your sensor readings, like the ones below.
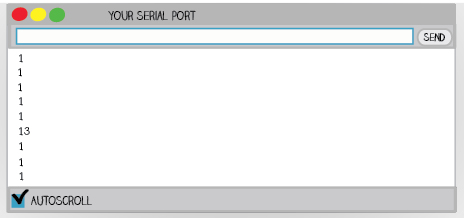
Try touching your keys and watch the numbers change. Notice how it’s difficult to know which number corresponds to which sensor. This printout isn’t formatted very well. Now you’re going to learn how to format this printout to make it more legible. You can do this by printing the sensor values for all 7 keys on a single line, so that the printout will look like the image below.
In the checkPianoKey procedure, where you do your printing, change the Serial.println statement to a Serial.print statement. Serial.println prints out touchValue followed by a carriage return. A carriage return creates a new line, like a hit to the return key on a keyboard. So, when you use Serial.println the next value you print shows up on the next line or “ln”. The new Serial.print statement—notice how the ln is missing from the end—prints out touchValue, but no carriage return (so the next value you print shows up on the same line, right after the last touchValue).
void checkPianoKey(int key, int note) {
    touchValue = readCapacitivePin(key); // read touch sensor value
    Serial.print(touchValue);            // send touchValue to the computer
    if (touchValue > 1)                  // if the key is pressed
    {
        tone(speaker, note);             // play a note
        delay(100);                      // wait for 1/10th of a second
    }
    else                                 // if the key is not pressed
    {
        noTone(speaker);                 // stop playing the note
    }
}
Make this change to your code and compile and upload it. Open up the Serial Monitor. Now the printout looks even worse than it did before! Do you have any ideas about why it might look so bad?
To fix the problem, add another Serial.print statement telling the LilyPad to print out a tab character after each touchValue. You can do this by adding the line Serial.print(“\t”); to your code right after the Serial.print(touchValue); line. Note: The Arduino compiler can’t read tabs that you type in directly so the code. “\t” is how you tell Arduino to print a tab.
void checkPianoKey(int key, int note) {
    touchValue = readCapacitivePin(key); // read touch sensor value
    Serial.print(touchValue);            // send touchValue to the computer
    Serial.print("\t");                  // send a tab
    if (touchValue > 1)                  // if the key is pressed
    {
        tone(speaker, note);             // play a note
        delay(100);                      // wait for 1/10th of a second
    }
    else                                 // if the key is not pressed
    {
        noTone(speaker);                 // stop playing the note
    }
}
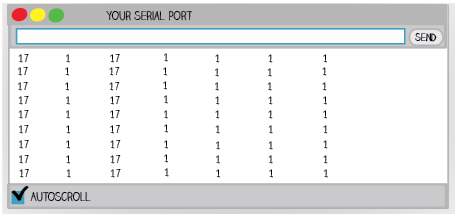
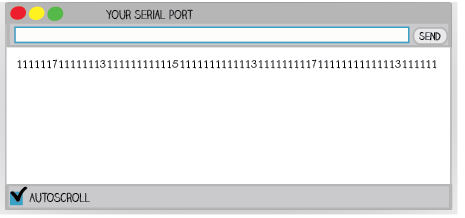
Compile and upload this code and reopen the Serial Monitor. Things should look a bit better, but you have a display problem that’s similar to the one you started with. Though the numbers have space between them, they’re still on one horizontal line and it’s hard to figure out which number corresponds to which key. Each time the checkPianoKey procedure is called, it prints out one number followed by a tab, but there is never a carriage return so everything is printed out on one very long line.
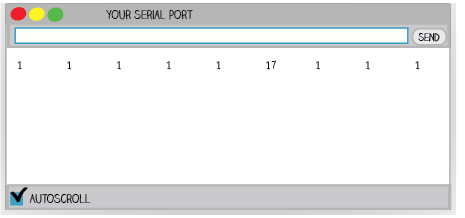
It would be useful to be able to start the printout on a new line each time the loop section of code runs, because you read in new touchValues for each key each time loop runs, and you want to easily view these updated values. To do this, add one more line of code to loop: Serial.println();. This line will send a carriage return to the computer each time loop executes, just after the seven procedure calls. Note that the parentheses after Serial.println(); are empty. This is because we don’t want to add any new text to the printout, we just want a new line.
void loop() {
    checkPianoKey(key1, 1046);     // play a C
    checkPianoKey(key2, 1175);     // play a D
    checkPianoKey(key3, 1319);     // play a E
    checkPianoKey(key4, 1568);     // play a G
    checkPianoKey(key5, 1760);     // play a A
    checkPianoKey(key6, 2093);     // play a C
    checkPianoKey(key7, 2349);     // play a D
    Serial.println();
    delay(100);
}
Upload this code to your LilyPad, and open the Serial Monitor. Touch a few different keys while you watch the Monitor. Notice how it’s now much easier to determine which number on the printout corresponds to a particular key on your piano.
Save your code.
Printing out your sensor information in this structured way makes troubleshooting much easier. Now, you can see exactly how each sensor is responding. It’s easy to tell if a particular sensor isn’t working. For instance, if you touch the second key and the second column in your printout doesn’t change, you know there’s a problem with your second key. You might have an electrical problem, like a loose connection, or a problem with your code—maybe you’re calling checkPianoKey with key1 twice in a row instead of calling it first with key1 and then with key2.
Watching the printout lets you quickly identify the source of many problems. In general, carefully watch your printouts when you’re troubleshooting your projects. They can provide very valuable information about the source of errors and well-formatted printouts provide infinitely more useful information than poorly formatted ones do.