MAKE YOUR MONSTER SING
THE TONE PROCEDURE
You’re going to use Arduino’s built-in tone procedure to create sound. This is what a line of code using the tone procedure looks like:
tone(5, 1760); // play a note
The two numbers in parentheses after tone are the inputs to the procedure. Each of the two numbers changes the behavior of the procedure.
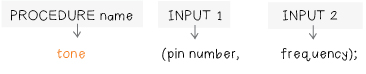
• pin number: This input is the pin number that the (+) end of your speaker is attached to.
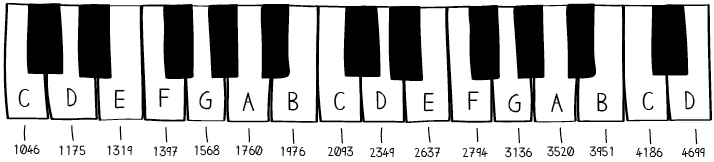
• frequency: This input is the frequency (or pitch) of the sound you want to play; the frequency is measured in Hertz (pulses per second). See the figure below for a chart of frequencies for one scale. (See this website for a more extensive chart of the frequencies for different notes: http://www.sewelectric.org/MusicalNotes.
Here is how you would use the tone procedure to play the note A:
tone(5, 1760);
With this line, you’re telling the tone procedure that your speaker is connected to pin 5 and you want to play a sound at a frequency of 1760 Hertz (note A).
Note: Sound is created by vibrations of molecules in the air. When these vibrations hit your ear, your eardrums vibrate and you hear a note. When air molecules vibrate very quickly, you hear a high note; when they vibrate more slowly, you hear a low note. A speaker makes sound by vibrating and making the air vibrate at a particular speed, called a frequency. Inside the LilyPad speaker there is a material that moves in response to electricity. When this material moves it creates air vibrations and sound.
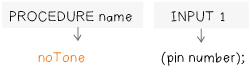
The tone procedure will play a note until you tell it to stop. The noTone procedure tells the LilyPad to stop playing a sound. The noTone procedure takes one input, the pin number that the (+) side of your speaker is attached to.
Here’s how you would play the note A for 1 second (1000 milliseconds) and then pause for 1 second:
 tone(5, 1760);    // note A begins playing
 delay(1000);      // note plays for 1 second
 noTone(5);        // note stops playing
 delay(1000);      // silence for 1 second
MAKE A SOUND
Attach your LilyPad to your computer, snap it onto your Protoboard, and open the Arduino software.
Open the code you wrote in the last section by clicking on the upward pointing arrow on the Arduino Toolbar and selecting the file you saved earlier. When it’s open it should look something like this:
int led = A4;

void setup() {
    pinMode(led, OUTPUT);
}

void loop() {
    blinkPattern();
}

void blinkPattern() {
    digitalWrite(led, HIGH);
    delay(100);
    digitalWrite(led, LOW);
    delay(100);
    digitalWrite(led, HIGH);
    delay(500);
    digitalWrite(led, LOW);
    delay(500);
}
Note: Since you are not going to edit the blinkPattern procedure now, the rest of this section does not include it in the program snapshots. However, you should still keep the blinkPattern procedure at the end of your code.
Add a variable called speaker to the code to tell the LilyPad what pin number your speaker is attached to.
This line should go right after the int led = A4; line. Since the (+) side of the speaker in our example is attached to pin 5, the code here sets speaker to 5. You should set the speaker variable to the number of the pin your speaker is attached to.
int led = A4;
int speaker = 5;

void setup() {
    pinMode(led, OUTPUT);
}

void loop() {
    blinkPattern();
}
Next, set the pinMode for the speaker in the setup section. A speaker, like an LED, is an output—you’re sending sound out into the world. So, you need to set the speaker pin to be an output. Add the line pinMode(speaker, OUTPUT); to your program, right after the line pinMode(led, OUTPUT);.
Also, so that you can focus on your sound generation code and not worry about your blink code, comment out the call to blinkPattern by adding // to the beginning of that line.
Upload this code to your LilyPad. Your LED should stop blinking, but your speaker won’t produce any sounds yet.
int led = A4;
int speaker = 5;

void setup() {
    // initialize the digital pin as an output
    pinMode(led, OUTPUT);
    pinMode(speaker, OUTPUT);
}

void loop() {
    //blinkPattern();
}
Now, add a call to the tone procedure at the end of the loop section of your code to get it to play the note A.
int led = A4;
int speaker = 5;

void setup() {
    pinMode(led, OUTPUT);
    pinMode(speaker, OUTPUT);
}

void loop() {
    //blinkPattern();
    tone(speaker, 1760);
}
Compile and upload this new code. You should hear a continuous tone from your speaker. If no sound comes out of your speaker, see the troubleshooting reference at the end of this section. If the sound starts to drive you crazy, unplug the USB cable from your computer and turn off your LilyPad.
To give yourself a break from the continuous beeping, add a noTone statement and some delays to your loop section. Compile and upload the new code.
void loop() {
    // blinkPattern();
    tone(speaker, 1760);
    delay(500);
    noTone(speaker);
    delay(1000);
}
You may have noticed that it’s not very intuitive to use numbers (frequencies) for musical notes. You can use variables to make working with tone easier and more intuitive.
Add a variable for one octave to the top of your program right before the setup section.
int led = A4;
int speaker = 5;

int C = 1046;
int D = 1175;
int E = 1319;
int F = 1397;
int G = 1598;
int A = 1760;
int B = 1976;
int C1 = 2093;
Now you can use the names of notes in your code instead of their frequencies! You’ll almost assuredly find that the notes are much easier to remember. Edit the loop section of your code, replacing frequencies with notes:
void loop() {
    // blinkPattern();
    tone(speaker, A);
    delay(500);
    noTone(speaker);
    delay(1000);
}
Now, experiment with the tone procedure. To change the note that it plays, call the procedure with a different note input. To change how long the note plays, adjust the delay after tone. For instance, the code shown below shows how you would play the note C for 1 second.
void loop() {
    // blinkPattern();
    tone(speaker, C);
    delay(1000);
    noTone(speaker);
    delay(1000);
}
Compile and upload the code each time you change it to try out your edits. Save your code by clicking on the downward pointing arrow in the Toolbar.
PLAY A SONG
You can make the monster sing the first two verses of a song called Hot Cross Buns by editing the loop section so that it looks like the code below.
void loop() {
    // blinkPattern();
    tone(speaker, E);
    delay(2000);
    tone(speaker, D);
    delay(2000);
    tone(speaker, C);
    delay(2000);
    noTone(speaker);
    delay(2000);

    tone(speaker, E);
    delay(2000);
    tone(speaker, D);
    delay(2000);
    tone(speaker, C);
    delay(2000);
    noTone(speaker);
    delay(2000);
}
Try making this change to your program and compiling and uploading the new code. Can you recognize the song?
Notice how the two verses consist of three notes followed by a pause. Also notice how the three-note phrase is repeated twice.
Now you’re going to shorten this repetitive code by writing a procedure.
Create a procedure called song to store “Hot Cross Buns”. Add the code shown below to your program, just after the closing bracket of the loop section but before the blinkPattern procedure definition.
void song() {
}

void blinkPattern() {
    digitalWrite(led, HIGH);
    delay(100);
    digitalWrite(led, LOW);
    delay(100);
    digitalWrite(led, HIGH);
    delay(500);
    digitalWrite(led, LOW);
    delay(500);
}
This creates the basic skeleton for your song procedure, but there’s no code in its body yet—inside its curly brackets. To give the song procedure some behavior, add the first verse of “Hot Cross Buns” to its body, as is shown here:
void song() {
    tone(speaker, E);
    delay(2000);
    tone(speaker, D);
    delay(2000);
    tone(speaker, C);
    delay(2000);
    noTone(speaker);
    delay(2000);
}

void blinkPattern() {
    ...
}
Next, to make use of your new procedure, you need to call it in the loop section of your code. Edit your loop section so that it looks like this:
void loop() {
    // blinkPattern();
    song();
    song();
}
Try compiling and uploading your code with this new addition to make sure you haven’t made any errors.
The behavior of your monster should be the same as it was before. Notice that you’ve replaced sixteen lines of code with two! Two calls to the song procedure replaced sixteen lines of code.
This example illustrates one way that procedures are powerful: they enable you to give a name to a piece of code that is repeated. Then, instead of typing out the repeated code over and over again, you can just call the procedure.
PROCEDURE INPUTS
Procedures are powerful in other ways too. What if you wanted to make your song play faster? Say, hold each note for 1 second (1000 milliseconds) instead of 2 seconds (2000 milliseconds)? You could write a new procedure called fastSong that looks like the example below. (Note: Don’t make any changes to your code yet. Just read along for a moment.)
void fastSong() {
    tone(speaker, E);
    delay(1000);
    tone(speaker, D);
    delay(1000);
    tone(speaker, C);
    delay(1000);
    noTone(speaker);
    delay(1000);
}
What if you wanted to make the song even faster, holding each note for ½ a second (500 milliseconds) instead of one second? Then you’d need a third procedure. And if you wanted to go faster still, you’d need a fourth!
This seems pretty crazy—especially since the basic behavior, the three notes played in a row, stays essentially the same. All you want to do is adjust how quickly the notes are played.
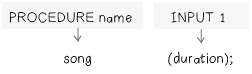
You can use another powerful feature of code to capture this range of possible speeds in a single procedure. You can add an input variable to your procedure that controls how long the notes are played. Change your song procedure to take an input called duration and change each instance of delay(1000); to delay(duration);
void song(int duration) {
    tone(speaker, E);
    delay(duration);
    tone(speaker, D);
    delay(duration);
    tone(speaker, C);
    delay(duration);
    noTone(speaker);
    delay(duration);
}
The (int duration) addition in the first line tells Arduino that the procedure song requires an input called duration that’s an int (short for an integer, a whole number). When you call song you now need to include a number for duration. Here’s a call with a duration of 2 seconds: song(2000);
The example below shows how you’d get your original slow song to play. Make these edits to your code and try compiling and uploading it. You should hear the same song as before. When song runs, every instance of duration is replaced by the number you put in parentheses after song. In the example below, every duration in the song procedure would be replaced by 2000.
void loop() {
    // blinkPattern();
    song(2000);
    song(2000);
}
Now edit the loop section to take advantage of the new duration input to song like the example code below.
void loop() {
    // blinkPattern();
    song(2000);       // play the song slowly
    song(1000);       // play the song faster
    song(500);        // and even faster
    delay(5000);
}
Compile and upload your new version of the code. Does the song sound different? Can you hear the speed changes? Save your code by clicking on the downward pointing arrow in the Toolbar.