GIVE YOUR MONSTER A SENSE OF TOUCH
This section describes how to add a touch sensor to your monster. Sensors allow projects to respond to inputs like switch presses or changes in light levels. In this case a touch sensor will enable your monster to blink or play songs when someone holds its paws. The sensor you’ll explore here is a type of sensor called a resistive sensor.
DESIGN YOUR SENSOR
The sensor you’re building consists of two aluminum foil patches. These patches will detect when a person touches them. A person has to touch both patches at the same time for the sensor to “feel” the touch. The patches are attached to the monster’s paws so that the monster can detect when someone holds its hands. Add these patches to your design sketch.
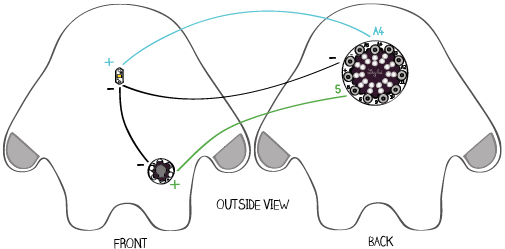
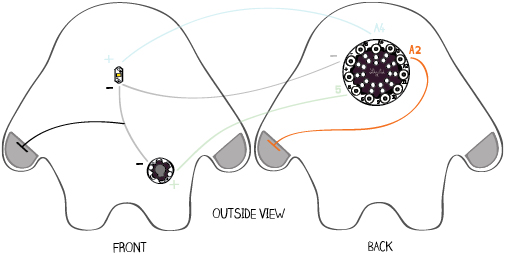
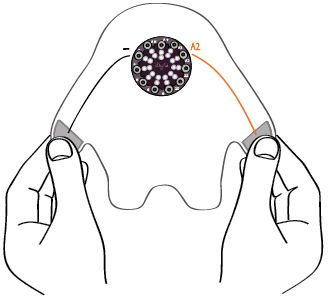
For the sensor to function electrically, one paw needs to be attached to (-) on the LilyPad and the other needs to be attached to tab A2, A3, A4, or A5. It cannot be attached to tab 5, 6, 9, 10, or 11. Here, the second paw is attached to tab A2. Though it looks like there are 4 sensors on the monster, note that when you stitch the monster together you’ll only have 2: one on each paw, covering both the front and back of the paws.
Use colored pencils to add these details to your design sketch. Use black for the (-) paw and a new color for the A2 paw.
MAKE YOUR SENSOR
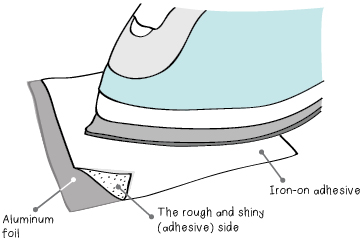
Get out your aluminum foil, iron-on adhesive, and iron. Read through the instructions on the heat-n-bond packaging to find the correct temperature setting for your iron and to familiarize yourself with the iron on process. Place a piece of aluminum foil on your ironing board. Place a matching piece of iron-on adhesive on the aluminum foil. The rough and shiny (adhesive) side should be facing down. Iron the adhesive to the foil.
Make sure that the adhesive is firmly attached by peeling up a small corner of the paper. It should peel away easily and you should see a layer of clear adhesive stuck to the aluminum foil. Just peel up enough paper to check on the adhesive. Don’t peel away the paper yet. Now you want to design and cut your sensors. On the paper that is attached to the aluminum foil, draw the shapes for your sensor patches. The monster template you made may be useful for this step.

Cut out your sensor patches, peel the paper off of them, and iron them onto your monster. Make sure that the adhesive side of the aluminum foil is facing your fabric. You don’t want the glue to stick to your iron. It’ll make a sticky mess!

SEW YOUR SENSOR
Next, mark the connections between your sensor patches and the rest of your circuit on your fabric using chalk or a pencil. Get ready to sew the connections between your patches and the rest of your circuit.
On the back piece of the monster, sew from pin A2 on the Protoboard to one patch. Make at least three running stitches through the aluminum foil to create a solid electrical connection between the patch and your conductive thread. Tie a knot and cut your thread.
On the front piece of the monster, sew from the (-) trace near your LED to the second sensor patch.
WRITE A PROGRAM TO DETECT PAW-TO-PAW CONTACT
Attach your LilyPad to your computer and snap it onto your Protoboard. Open the Arduino software. Open the code you wrote in the last section by clicking on the upward pointing arrow on the Arduino Toolbar and selecting the file you saved earlier.
Begin by adding a variable called aluminumFoil to the top of your program right below the int speaker = 5; line. This will tell the LilyPad which tab the aluminum foil patch is connected to.
You also need a pinMode statement like pinMode(led, OUTPUT); for your sensor to tell the LilyPad what kind of device is attached to the aluminumFoil pin. A sensor is an input, not an output, so the statement is slightly different; you use INPUT instead of OUTPUT.
int led = A4;
int speaker = 5;
int aluminumFoil = A2;

int C = 1046;
int D = 1175;
int E = 1319;
int F = 1397;
int G = 1598;
int A = 1760;
int B = 1976;
int C2 = 2093;

void setup() {
    pinMode(led, OUTPUT);
    pinMode(speaker, OUTPUT);
    pinMode(aluminumFoil, INPUT);
}
Now you’re going to add several lines of code to your program. You’re going to add a new variable called sensorValue, you’re going to initialize the sensor pin in setup and you’re going to read information from the sensor. The new lines are highlighted in the example program below. The tutorial will explore what each line does soon. For now, edit your code so that it looks like the example.
int led = A4;
int speaker = 5;
int aluminumFoil = A2;
int sensorValue;

int C = 1046;
int D = 1175;
int E = 1319;
int F = 1397;
int G = 1598;
int A = 1760;
int B = 1976;
int C1 = 2093;

void setup() {
    pinMode(led, OUTPUT);
    pinMode(speaker, OUTPUT);
    pinMode(aluminumFoil, INPUT);
    digitalWrite(aluminumFoil, HIGH); // initializes the sensor
}

void loop() {
    blinkPattern();
    song(2000);
    delay(5000);
    sensorValue = digitalRead(aluminumFoil);
}
Try compiling and uploading this code. (Note: It won’t do anything different than it did before yet.) If you encounter compile errors, read through your program carefully to make sure the code you added matches the example. Look especially for missing brackets “{“ “}”, and semicolons “;”. If you continue to have problems, see the troubleshooting section.
DIGITALREAD
Now, look at the new line you’ve added to the loop section:
sensorValue = digitalRead(aluminumFoil);
This is the line that reads information from the sensor. Instead of writing information to a pin like digitalWrite, digitalRead reads information from a pin. When you want to gather information about actions happening in the world with an input device (like a sensor) you use a reading procedure like digitalRead. When you want to take action in the world with an output (like an LED or speaker) you use a writing procedure like digitalWrite.

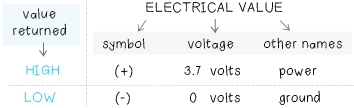
digitalRead is the first procedure you’ve encountered that returns a value. The basic procedure format is shown above. Returning means that the procedure gives something back to you when you call it. digitalRead, tells you whether a pin is HIGH or LOW. It returns LOW when the pin is connected to ground (-) and HIGH when the pin is connected to power (+). A chart showing how these values relate to voltages is shown below.
IF ELSE
Now that you know how to read information from your sensor you can use it to control your monster’s behavior. Say you want your LED to light up if digitalRead returns LOW and turn off if digitalRead returns HIGH. The way you describe this situation in code is similar to the way you’d say it in a sentence. You use what’s called a conditional statement to something like the statement below. Except, in your program you replace the word “otherwise” with the word “else”.
if digitalRead returns LOW
    the LED should turn on
otherwise
    the LED should turn off
The basic code structure of an if else conditional statement is shown below. Notice how the body of the if and else statements are enclosed in curly brackets. Also notice how the condition is inside a pair of parentheses.
if (condition)
{
    // do something
}
else
{
    // do something else
}
Now you’ll write an actual conditional statement to see how the code’s punctuation, structure, and behavior all come together. First, comment out everything in loop except the sensorValue = digitalRead(aluminumFoil); statement. (Note: You may have more than three lines that need to be commented out of your code. Comment out all of the blinking and song playing code before you move on to the next step.) Next, add an if else statement like the one shown below to your loop section. Compile and upload your code.
void loop() {
    // blinkPattern();
    // song(2000);
    // delay(5000);
    sensorValue = digitalRead(aluminumFoil);
    if (sensorValue==LOW)
    {
        digitalWrite(led, HIGH);
    }
    else
    {
        digitalWrite(led, LOW);
    }
}
When you touch the two sensor paws together, the paw connected to pin A2 and the paw connected to (-), the monster’s LED should turn on. Note: This may be a little awkward, but you need to make sure the paws that you stitched are touching. The paws with aluminum foil but no stitching won’t work. If your monster is working well, save your program.
WRITE A PROGRAM TO DETECT PERSON-TO-MONSTER CONTACT
The program you just wrote lets your monster change its behavior when it presses its paws together. This is cool, but the goal is to have the monster respond when you touch it. To get the monster to respond to human touch, you’ll need to use a different reading procedure. digitalRead can detect direct contact between the sensor pin (pin A2) and the ground pin (-). It can detect when the sensor pin is LOW (when its touching the ground pin) and when it’s HIGH (when it’s not touching the ground pin), but that’s it. digitalRead can gather HIGH/LOW or digital information from switches—you close a switch when you touch the monster’s two paws together.
A procedure called analogRead can gather more complex analog information from sensors. For the monster, analogRead can detect when the two paws are touching, and also when something slightly conductive (like a person) is touching the two paws, connecting them. Furthermore, as you’ll see in a moment, it can even detect how hard you’re pressing on the paws when you touch them!
To begin experimenting with analogRead, replace digitalRead(aluminumFoil); with analogRead(aluminumFoil); like the example shown below.
void loop() {
    // blinkPattern();
    // song(2000);
    // delay(5000);
    sensorValue = analogRead(aluminumFoil);
    if (sensorValue==LOW)
    {
        digitalWrite(led, HIGH);
    }
    else
    {
        digitalWrite(led, LOW);
    }
}
Now you’re going to add a few lines to your program that will let you see how analogRead works. You’re going to send the readings taken by analogRead back to the computer, where you’ll display them on your screen. You’ll send the readings back through your serial port—the usb cable that connects your LilyPad to your computer.
First, add a line to initialize the serial port to the setup section. Then, add two lines to the loop section, as shown below. Compile and upload this new code.
void setup() {
    pinMode(led, OUTPUT);
    pinMode(speaker, OUTPUT);
    pinMode(aluminumFoil, INPUT);
    digitalWrite(aluminumFoil, HIGH);
    Serial.begin(9600);               // initialize serial port
}

void loop() {
    // blinkPattern();
    // song(2000);
    // delay(5000);
    sensorValue = analogRead(aluminumFoil);
    Serial.println(sensorValue);      // send sensorValue to computer
    delay(100);                       // delay 1/10 of a second
    if (sensorValue==LOW)
    {
        digitalWrite(led, HIGH);
    }
    else
    {
        digitalWrite(led, LOW);
    }
}
Click on the magnifying glass icon in the upper right hand corner of the Arduino window. When you hover over this icon, a message that says “Serial monitor” will appear.

A small window called the “Serial Monitor” will pop up. Any values your LilyPad’s program sends back to the computer while it’s running will appear in this window. You should see a steady stream of numbers. These values should be close to 1000.
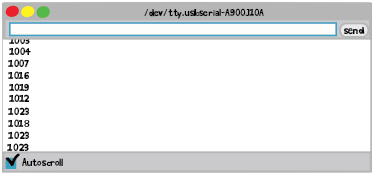
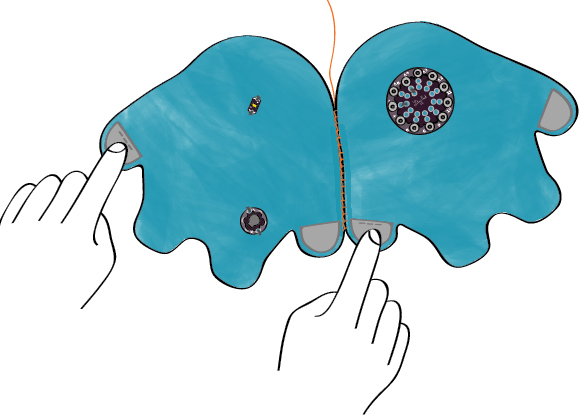
Now try touching your aluminum foil patches. Use one hand on each patch and make sure you’re touching the two patches that are sewn to the Protoboard (see below). Watch the Serial Monitor. Try pressing your palms firmly against the pads and then lessening the pressure. The numbers should decrease noticeably to values in the 900s or below.
If you don’t see any changes, make sure you’re touching one hand firmly to each of the sewn patches of your sensor like in the diagram shown below. If your sensor still doesn’t work—if the numbers in the Serial Monitor don’t change—see the troubleshooting section.
ANALOGREAD
Now you’ll explore what this new code is doing—how it’s translating your touch into numbers in the Serial Monitor.
Look at the heart of the code, the loop section. The first line after the commented-out code is: sensorValue = analogRead(aluminumFoil); Like digitalRead, this line reads information from your aluminum foil sensor. The information read from the sensor is then stored into the variable called sensorValue.
void loop() {
    // blinkPattern();
    // song(2000);
    // delay(5000);
    sensorValue = analogRead(aluminumFoil);
    Serial.println(sensorValue);
    delay(100);     // delay for 1/10 of a second
}
Like digitalRead, the analogRead procedure reads sensor data from a pin on the LilyPad. It takes one input, the pin number that your sensor is attached to, and gives back, or returns, a value that corresponds to the sensor reading. However, unlike digitalRead, which returns only two values, HIGH or LOW, analogRead returns a range of values, numbers between 0 and 1023. This means analogRead can give you more complex and nuanced information about what is happening in the world than digitalRead can.

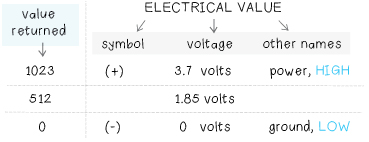
The analogRead procedure works by measuring the voltage level on a pin. It returns a number between 0 and 1023 that corresponds to this voltage. The table below shows how a few of the numbers it returns correspond to voltages.
Returning to the sensor and the numbers that you’re seeing in the Serial Monitor, why do the readings from the sensor change when you touch the sensor? Or, to put it a different way, why do the voltages measured at pin A2 change when you touch the sensor?
In the setup section of your program you set the sensor’s initial value to HIGH or 3.7 volts with this line:
digitalWrite(aluminumFoil, HIGH);
This is why you see very high numbers, numbers close to 1023 (or HIGH), in the Serial Monitor when you’re not touching the sensor. When you’re not touching the sensor, analogRead returns the sensor’s default value (HIGH).
When you touch the aluminum foil patches, one of your hands is connected to the (-) pin (which is at 0 volts, or LOW) and one of your hands is connected to pin A2 (which is at 3.7 volts, or HIGH). Your body, which is slightly conductive, creates an electrical connection between (-) and the sensing pin A2. This has the effect of lowering the voltage on pin A2, bringing it closer to 0 volts. This is why the numbers in the Serial Monitor go down when you touch the sensor.
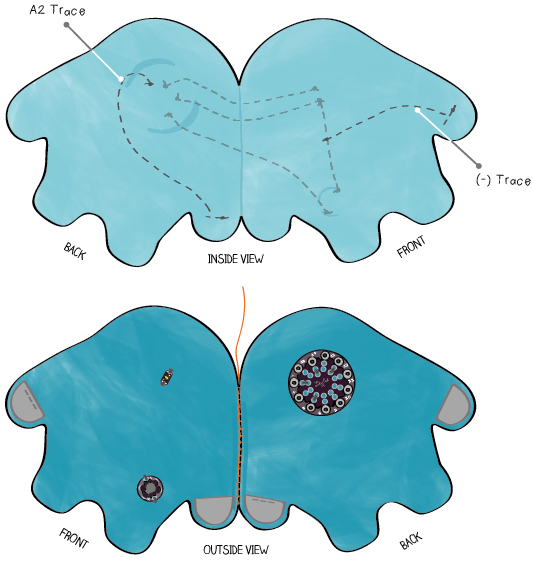
If you folded your monster in half and looked at it from the back, it would look like the drawing below.
The harder you squeeze on the sensor, the stronger the connection is between your body and the aluminum foil, and the better the electrical connection is between (-) and A2. This is why you see lower numbers as you squeeze harder. This is also why you see very low numbers (close to 0) when you touch the two paws directly together.
This type of sensor is called a resistive sensor.
SERIAL.PRINTLN
The code you just wrote is doing another important thing that you haven’t examined yet. It is sending information from the LilyPad back to the computer, where it is displayed in the Serial Monitor. The lines of your program that take care of this important communication function are in the setup and loop sections. Each line that is involved in the communication is highlighted below.
void setup() {
    pinMode(led, OUTPUT);
    pinMode(speaker, OUTPUT);
    pinMode(aluminumFoil, INPUT);
    digitalWrite(aluminumFoil, HIGH);
    Serial.begin(9600);              // initialize serial port
}
void loop() {
    // blinkPattern();
    // song(2000);
    // delay(5000);
    sensorValue = analogRead(aluminumFoil);
    Serial.println(sensorValue);     // send sensorValue to computer
    delay(100);                      // delay 1/10 of a second
    if (sensorValue==LOW)
    {
        digitalWrite(led, HIGH);
    }
    else
    {
        digitalWrite(led, LOW);
    }
}
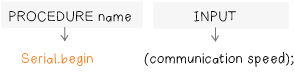
There are two important pieces to the communication code. First, in the setup section, you need to tell the LilyPad that it will be communicating back to the computer and you need to tell the LilyPad how fast it should talk to the computer. The LilyPad and the computer can “talk” at different speeds and they need to be talking at the same speed to understand each other.
The line Serial.begin(9600); tells the LilyPad that it should talk at the speed of 9600 bits per second. You are using speed 9600 because it is the standard Arduino communication speed. This speed is also known as baud rate.
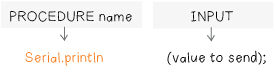
The second piece of communication code is in the loop section. It’s in loop that you actually send information from the LilyPad to the computer. In this program, you’re sending the readings you took from your sensor back to the computer. The lines that do this are:
Serial.println(sensorValue);
delay(100);      // delay for 1/10 of a second
The Serial.println procedure tells the LilyPad to send what is in its parentheses back to the computer, to be displayed in the Serial Monitor. Each value is printed on its own line. In the case of your code, the sensor readings that are read with analogRead and stored in the variable sensorValue, get sent back to the computer. These are the values you see in your Serial Monitor.
There is one last important piece of the communication code, the statement delay(100); This short delay gives the computer time to process and display the information that the LilyPad is sending. Without this delay, the computer will become overloaded with information from the LilyPad and crash. Whenever you have a Serial.println statement in your code, you also need a delay statement.
PUT IT ALL TOGETHER: CONTROL THE LED AND SPEAKER
Now you want to change your if else statement to take advantage of the numbers you’re getting back from analogRead. You saw earlier, from the numbers in the serial monitor, that you get sensor values around 1023 when you aren’t touching the monster, and that these values decrease when you squeeze the two paws.
Watch the serial monitor as you hold the monster’s paws. Make a note of the highest number that you get when you are holding the paws. Write this number down on a sheet of paper. (Note: This number should be significantly lower than 1023. If it is not, you should see the troubleshooting section.)
Now you know that if the sensor values drop below the value that you wrote down, the monster’s paws are being touched. You can think of this value as a touch-threshold value. If your sensorValue numbers are above the threshold, the monster isn’t being touched. It they’re below the threshold, the monster is being touched.
You can use this threshold information in your if else statement. Change your code so that the LED turns on if the monster is being touched and turns off if the monster is not being touched. To do this, you need to make one small change to your if statement.
The code example below uses a threshold of 1000. Your threshold may be slightly lower than this, but it shouldn’t be higher.
void loop() {
    // blinkPattern();
    // song(2000);
    // delay(5000);
    sensorValue = analogRead(aluminumFoil);
    Serial.println(sensorValue);    // send sensorValue to computer
    delay(100);                     // delay 1/10 of a second
    if (sensorValue < 1000)
    {
        digitalWrite(led, HIGH);
    }
    else
    {
        digitalWrite(led, LOW);
    }
}
Make the change to your code and compile and upload the new version. What happens to your LED when you touch your sensors? What happens to the LED when you let go of the sensors?
If your monster isn’t behaving predictably yet, adjust your threshold until the LED always turns on when you touch the sensors and always turns off when you let go.
Now, instead of turning the LED on and off when you touch your sensors, you can have it blink or sing, using the procedures you wrote earlier. Edit the code so that your monster sings when its paws are touched and blinks otherwise. Move the calls to blinkPattern and song into your if statement and remove the // characters on each of their lines. Your code should look something like the example shown below. Compile and upload your code. Save it and test out your monster.
void loop() {
    sensorValue = analogRead(aluminumFoil);
    Serial.println(sensorValue);
    delay(100);
    if (sensorValue < 1000)
    {
        song(2000);
    }
    else
    {
       blinkPattern();
    }
}
Note: You may find that you have to hold your monster’s hands for a long time before your song plays. This is because the LilyPad has to complete the blinkPattern procedure before it checks on the sensor. If your blinkPattern takes a long time to run, you’ll have to wait a long time before your monster responds to your touch.
EXPERIMENT
Experiment with your code to try out different behaviors. For example, can you have your monster play a song slowly when you’re touching the paws lightly and quickly when you’re touching the paws firmly?
SAVE YOUR CODE
When you’re happy with your program, save it by clicking on the downward pointing arrow in the Toolbar.
Your entire program should now look something like this. Note that the bodies of the song and blinkPattern procedures will be different in your code and the loop section may be slightly different as well.
int led = A4;
int speaker = 5;
int aluminumFoil = A2;
int sensorValue;

int C = 1046;
int D = 1175;
int E = 1319;
int F = 1397;
int G = 1598;
int A = 1760;
int B = 1976;
int C1 = 2093;

void setup() {
    pinMode(led, OUTPUT);
    pinMode(speaker, OUTPUT);
    pinMode(aluminumFoil, INPUT);
    digitalWrite(aluminumFoil, HIGH);     // initializes the sensor
    Serial.begin(9600);                   // initializes the communication
}

void loop() {
    sensorValue = analogRead(aluminumFoil);
    Serial.println(sensorValue);
    delay(100);                           // delay for 1/10 of a second
    if (sensorValue < 1000)
    {
        song(2000);
    }
    else
    {
        blinkPattern();
    }
}

void song(int duration) {
    tone(speaker, C);
    delay(duration);
    tone(speaker, D);
    delay(duration);
    tone(speaker, E);
    delay(duration);
    tone(speaker, F);
    delay(duration);
    tone(speaker, G);
    delay(duration);
    tone(speaker, A);
    delay(duration);
    tone(speaker, B);
    delay(duration);
    tone(speaker, C1);
    delay(duration);
    noTone(speaker);
    delay(duration);
}

void blinkPattern() {
    digitalWrite(led, HIGH);
    delay(100);
    digitalWrite(led, LOW);
    delay(100);
    digitalWrite(led, HIGH);
    delay(500);
    digitalWrite(led, LOW);
    delay(500);
}