BUILD YOUR BRACELET
Using the template you created at the beginning of the design process, mark the shape of your bracelet on a piece of felt with a marker or a piece of chalk. Cut out this shape.

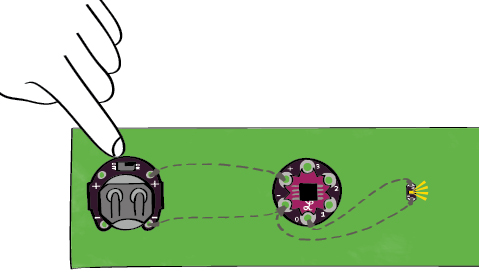
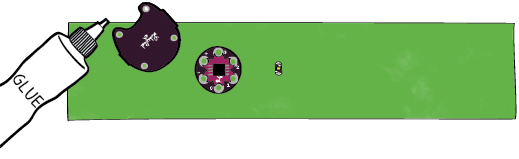
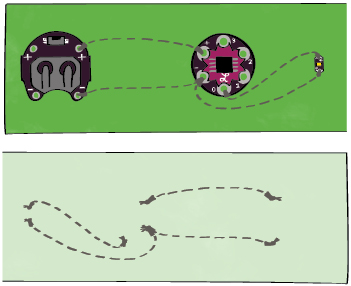
Glue your battery, LilyTiny, and LED to the top side of your bracelet fabric. Use only as much glue as you need to attach the pieces. Be careful not to fill any of the tabs on the pieces since you’ll need to sew through these in a moment.
Using a piece of chalk or a pencil, mark the traces that connect your battery holder, LilyTiny, and LED on your fabric.
SEW YOUR BATTERY HOLDER AND LILYTINY
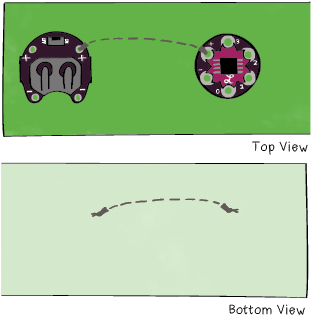
Measure out 2-3’ (1 meter) of conductive thread and thread your needle. Tie a knot underneath the appropriate (+) tab on the battery holder. (See the bookmark tutorial for a detailed description of how to tie a knot.) Push your needle up through the fabric alongside the (+) tab. Sew tightly through the (+) tab at least three times, securing the battery holder to the fabric.
Sew from this (+) tab to the (+) tab on the LilyTiny, following the trace you drew. When you reach the LilyTiny, sew through its (+) tab at least three times. When you’re done, thread your needle to the back of the fabric—underneath the LilyTiny—and make sure there are no loose threads in your stitching. Pull on the thread until your connections are snug and tie another knot. Trim the tails of both of your knots to about ¼” (6mm) and seal them with a dab of glue.
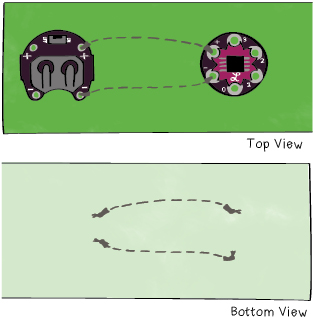
Repeat this process for the (-) tabs on the battery holder and LilyTiny. Sew from a (-) tab on the battery holder to the (-) tab on the LilyTiny following your chalk or pencil lines. Make sure that you sew through each tab at least three times and tie tight knots at each end of your stitching.
Before moving on, trim all of your knots and secure them with glue. Look closely at the stitching you’ve done so far and make sure that your (+) and (-) threads are not touching each other and creating a short circuit.
SEW YOUR LED
Tie a knot underneath the (-) tab on the LilyTiny and loop through it snugly at least three times. This thread will connect with the thread you’ve just sewn for the battery connection. That’s fine. (Note: We’re going to stop telling you to sew through each tab at least three times now because it seems terribly repetitive, but whenever you sew through a tab, you need to loop through it tightly, three or more times.)
Stitch from the (-) tab on the battery holder to the (-) tab of your LED. Sew through the (-) tab of your LED, securing it tightly, and tie a knot on the underside of your fabric.
For the (+) tab of your LED, begin by tying a knot underneath the tab you chose on the LilyTiny (tab 0 for the design here). Stitch tightly through this tab and sew across your fabric to the LED.
When you’ve finished sewing through the (+) tab on the LED, tie a knot underneath it. Tie this knot as far away from the (-) tab’s knot as you can to prevent a short circuit. Trim all of your knots to ¼” (6mm) and dab glue on them. Look closely at the stitching you’ve done so far to make sure that none of your threads are touching where they shouldn’t be.
TEST THE CIRCUIT
The electrical part of your bracelet is now done and it’s time to test it out. Slide your battery into the holder. The flat side with a (+) sign on it should face up as you put it into the holder. Flip the switch on the battery holder and see what happens. Does your LED blink, flicker, fade, or thump the way it should? If you’re having problems, check out the troubleshooting section at the end of this tutorial.