ARDUINO PROGRAM STRUCTURE
The previous section looked at different code elements in the Arduino/C language. Now you’ll see how they come together into a complete program. Open a fresh version of the Blink example by clicking on the upward pointing arrow in the Toolbar and then selecting 01.Basics → Blink. Then, copy and paste the following example code into your Arduino window, replacing all of the code in your window with the code below:
/*
 Blink
 Turns on an LED for one second, then off for one second, repeatedly.

 This example code is in the public domain.
*/

// Pin 13 has an LED connected on most Arduino boards.
// give it a name:
int led = 13;    // set the variable “led” to the value 13

// the setup routine runs once when you press reset:
void setup() {
    // initialize the digital pin as an output.
    pinMode(led, OUTPUT);
}

void loop() {
    digitalWrite(led, HIGH);  // turn the LED on
    delay(1000);              // wait for a second
    digitalWrite(led, LOW);   // turn the LED off
    delay(1000);              // wait for a second
}
As you have done before, click on the check mark button in the Toolbar to compile the code. A “Done compiling” message should appear in the Status Bar. If you receive an error message instead, make sure your code matches the code above exactly. Continue to edit and compile until you receive a “Done compiling” message.
Each Arduino program has three main parts:
1. variable declaration section
2. setup section
3. loop section
These sections are analogous to the ingredient list (variable declaration), preparation steps (setup), and cooking steps (loop) in a recipe. Here is a diagram showing where the three parts are located in the code:
When your program runs, it will first define your variables (the ingredients that you need), then execute the setup section once (set everything up to begin cooking), and then execute the loop section over and over (actually do the cooking).
Note: These sections are often preceeded by comments that describe what different sections of the program are doing.

1. VARIABLE DECLARATION SECTION
Programs often begin with introductory comments that explain what the program is doing. These comments come before the variable declarations. It is a good idea to begin every program with comments like these so that when you return to your program later you’ll know what it does.
Variables are usually declared at the beginning of a program immediately following the introductory comments. All of the variables that you are using in your code should be listed here, before the setup and loop sections.
2. SETUP SECTION
The setup section, which runs once when the program begins, follows the variable declaration section. Statements that lay the foundation for actions that happen later on in the program are put in the setup section. In particular, pinMode statements are almost always in this section. The section begins with the line void setup() {. Note that all statements in the setup section are placed between an open curly bracket ‘{‘ right after void setup() and a closed curly bracket ‘}’ at the end of the section.
void setup() {
    // initialize the digital pin as an output.
    pinMode(led, OUTPUT);
}
These brackets tell the Arduino software when the setup section begins and ends. Without them, the software is lost and unable to compile your code. Think of these curly brackets as additional punctuation that your code requires. Your code must be perfectly punctuated to compile.
Try removing the closing bracket of the setup section and compiling your code. The error message you get is particularly unhelpful.
void setup() {
    // initialize the digital pin as an output.
    pinMode(led, OUTPUT);
_
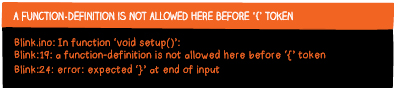
However, it does provide a clue to the problem in the last line: Blink:24: error: expected `}’ at end of input This identifies the problem as a missing ‘}’ somewhere in your program.
Replace the closing curly bracket and recompile your code.
Now, move the pinMode(led, OUTPUT); statement to the line after the closing curly bracket. Compile your code. You should get another baffling error message.
void setup() {
// initialize the digital pin as an output.
}
pinMode(led, OUTPUT);

But, Arduino also highlights the misplaced pinMode(led, OUTPUT); line in yellow—a good clue about the source of your problem.
Return the pinMode(led, OUTPUT); line to its proper position in the setup section and recompile your code.
It’s useful to familiarize yourself with these errors because missing or misplaced curly brackets are another common source of problems. Remember that the setup and loop sections should always begin with an open curly bracket and end with a closing curly bracket. (Later on you’ll learn that other important blocks of code also begin and end with curly brackets.)
Statements should only appear above the setup section (variable declarations appear here), inside the setup section’s curly brackets, or inside the loop section’s curly brackets.
void loop() {
    digitalWrite(led, HIGH); // turn the LED on
    delay(1000);             // wait for a second
    digitalWrite(led, LOW);  // turn the LED off
    delay(1000);             // wait for a second
}
If you encounter a compile error, the first things to check for are syntax errors like misspellings, missing semicolons, and misplaced or missing curly brackets.
3. LOOP SECTION
After the setup section runs, the loop section runs over and over until the LilyPad is turned off or reprogrammed—hence the word loop. The statements that carry out the main action of your program are in this section.
As with the setup section, statements in the loop section are placed between open and closed curly brackets. These curly brackets tell the computer when the loop section begins (with the opening curly bracket) and when it ends (with the closing curly bracket).
You will receive compile errors if either of the curly brackets is missing or if any statements are placed after the closing curly bracket or before the opening curly bracket.
Here are three loop sections that will not compile. See if you can find the problem in each example.
void loop()
    digitalWrite(led, HIGH); // turn the LED on
{
    delay(1000);             // wait for a second
    digitalWrite(led, LOW);  // turn the LED off
    delay(1000);             // wait for a second
}
void loop() {
    digitalWrite(led, HIGH); // turn the LED on
    delay(1000);             // wait for a second
    digitalWrite(led, LOW);  // turn the LED off
}
    delay(1000);             // wait for a second
void loop()
    digitalWrite(led, HIGH); // turn the LED on
    delay(1000);             // wait for a second
    digitalWrite(led, LOW);  // turn the LED off
    delay(1000);             // wait for a second