MAKE YOUR PIANO SING
Now you’ll write code that will tell your LilyPad to play a note when you touch your key. Like you did in the monster lesson, you’ll use a conditional statement to say:
• if a person is touching the key (that is, if you get a number greater than 1 back from readCapactivePin) the speaker should play a note.
if (condition)
{
    // do something
}
else
{
    // do something else
}
Recall from the monster tutorial that you can use the tone procedure to play a note and the noTone procedure to stop playing a note.

You’ll also be using musical note frequencies again, so some of the frequency values for different notes are listed below (reprinted from the monster tutorial).
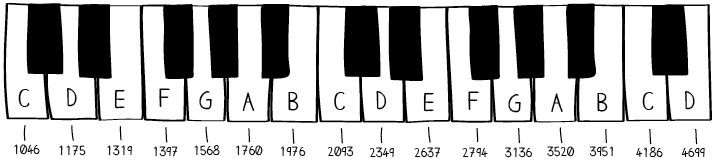
Now you’ll use these elements to play some sounds. Begin by adding variables that map the frequencies in the piano diagram to musical notes in your code. Add these variables right after the line int touchValue;
int touchValue;

// musical notes
int C = 1046;
int D = 1175;
int E = 1319;
int F = 1397;
int G = 1598;
int A = 1760;
int B = 1976;
int C1 = 2093;
int D1 = 2349;
Note: To preserve space, not all of the comments that were added to the code earlier are shown here, but you should keep all of the descriptive comments that you added to your code in place. They’re shown again on the next page.
Next, create and initialize a variable for your speaker. Create a variable called speaker and set its value to 5 (or the pin your speaker is sewn to). In the setup section add a line that sets this speaker pin to be an output.
int key1 = 6;                    // name of the first sensor key
int speaker = 5;                 // name of the speaker key
int touchValue;                  // will store sensor readings

// musical notes
int C = 1046;
int D = 1175;
int E = 1319;
int F = 1397;
int G = 1598;
int A = 1760;
int B = 1976;
int C1 = 2093;
int D1 = 2349;

void setup() {
    pinMode(key1, INPUT);         // set key1 to be an input
    pinMode(speaker, OUTPUT);     // set speaker to be an output
    Serial.begin(9600);           // initialize the communication
}
Compile and upload this code. It won’t do anything until you add some code to actually make sound, but you want to make sure it compiles.
Edit the loop section of your code to play a note with your speaker. (Before you use your sensor key to trigger sound, you want to make sure it actually works.) Use the tone and noTone procedures to play the note C on the speaker pin for 1 second.
void loop() {
    touchValue = readCapacitivePin(key1); // read the touch sensor value
    Serial.println(touchValue);           // send touchValue to computer
    delay(100);                           // delay for 1/10 of a second
    tone(speaker, C);                     // play the note C
    delay(1000);                          // wait for one second
    noTone(speaker);                      // stop playing the note
}
Upload this code to your LilyPad. Now your piano should be continuously making noise.
But, you want it to play a note only when you touch your key. To do this you need to add a conditional statement that tells the piano to play a note only if the key is pressed.
Add an if else statement to your code so that the note C plays for 100 milliseconds if someone is touching the key and turns off otherwise. Note how the comments in the example describe what each line of code is doing.
void loop() {
    touchValue = readCapacitivePin(key1); // read the touch sensor value
    Serial.println(sensorValue);          // send touchValue to computer
    delay(100);                           // delay for 1/10 of a second
    if (touchValue > 1)                   // if the key is pressed
    {
        tone(speaker, C);                 // play the note C
        delay(100);                       // wait for 1/10th of a second
    }
    else                                  // if the key is not pressed
    {
        noTone(speaker);                  // stop playing the note
    }
}
Now whenever the key is touched, whenever touchValue is greater than 1, the piano should play the note C and then wait for 1/10th of a second. The note will keep playing until the key is released, at which point the sound will cut off.
If your single-key piano is working well, save your code and go on to the next section. Your code should look more or less like the code below.
If your piano is not yet working, or if it is behaving erratically or unexpectedly, see the troubleshooting section.
int key1 = 6;                             // name of the first sensor key
int speaker = 5;                          // name of the speaker key
int touchValue;                           // will store sensor readings

// musical notes
int C = 1046;
int D = 1175;
int E = 1319;
int F = 1397;
int G = 1598;
int A = 1760;
int B = 1976;
int C1 = 2093;
int D1 = 2349;

void setup() {
    pinMode(key1, INPUT);                 // set key1 to be an input
    pinMode(speaker, OUTPUT);             // set speaker to be an output
    Serial.begin(9600);                   // initialize the communication
}

void loop() {
    touchValue = readCapacitivePin(key1); // read the touch sensor value
    Serial.println(touchValue);           // send touchValue to computer
    delay(100);                           // delay for 1/10 of a second
    if (touchValue > 1)                   // if the key is pressed
    {
        tone(speaker, C);                 // play the note C
        delay(100);                       // wait for 1/10th of a second
    }
    else                                  // if the key is not pressed
    {
        noTone(speaker);                  // stop playing the note
    }
}