MAKE YOUR PIANO SING, PART 2
Now that you’ve built all of your keys, you need to program them. Open up the Arduino software and the Piano program you’ve been writing.
The first thing that you need to do is tell the program that you’ve now got 7 keys to work with instead of 1. You want to add some new ingredients to your recipe, some new key variables to your program.
Add variables for each of your new keys to the top of your program. Each of your keys is an input (a sensor). You also need to initialize them in the setup section using pinMode statements. See the highlighted sections below.
// sensor keys
int key1 = 6;
int key2 = 9;
int key3 = 10;
int key4 = 11;
int key5 = A2;
int key6 = A3;
int key7 = A4;
int speaker = 5;               // name of the speaker key
int touchValue;                // will store sensor readings

//musical notes
int C = 1046;
int D = 1175;
int E = 1319;
int F = 1397;
int G = 1598;
int A = 1760;
int B = 1976;
int C1 = 2093;
int D1 = 2349;

void setup() {
    // set all keys to be inputs
    pinMode(key1, INPUT);
    pinMode(key2, INPUT);
    pinMode(key3, INPUT);
    pinMode(key4, INPUT);
    pinMode(key5, INPUT);
    pinMode(key6, INPUT);
    pinMode(key7, INPUT);
    pinMode(speaker, OUTPUT); // set speaker to be an output
    Serial.begin(9600);       // initialize the communication
}
Compile and upload this code to make sure you haven’t introduced any errors.
Now you need to tackle the core of the program’s behavior in the loop section. You’d like to program the LilyPad to play a different note for each key using the same code structure that you created for the first key. You need to write a conditional statement for each key that checks whether the key is being touched and plays a note if it is.
The loop section currently looks like the code below. This is a basic block of code that detects whether a piano key is touched, sends that information back to the computer, and plays a note if the key is touched.
You can use this same basic code block to control each piano key. You only need to change the key number and the note for the different keys. These variables are highlighted below.
touchValue = readCapacitivePin(key1);     // read the touch sensor value
Serial.println(touchValue);               // send touchValue to computer
delay(100);                               // delay for 1/10 of a second
if (touchValue > 1)                       // if the key is pressed
{
    tone(speaker, C);                     // play the note C
    delay(100);                           // wait for 1/10th of a second
}
else                                      // if the key is not pressed
{
    noTone(speaker);                      // stop playing the note
}
You could copy and paste this code into your program six different times, one for each key. (Don’t actually do this, just make a mental note that you could do things this way if you wanted to.) The code below shows what this would look like for the first three keys.
void loop() {
    touchValue = readCapacitivePin(key1); // read the touch sensor value
    Serial.println(touchValue);           // send touchValue to computer
    delay(100);                           // delay for 1/10 of a second
    if (touchValue > 1)                   // if the key is pressed
    {
        tone(speaker, C);                 // play the note C
        delay(100);                       // wait for 1/10th of a second
    }
    else                                  // if the key is not pressed
    {
         noTone(speaker);                 // stop playing the note
    }

    touchValue = readCapacitivePin(key2); // read the touch sensor value
    Serial.println(touchValue);           // send touchValue to computer
    delay(100);                           // delay for 1/10 of a second
    if (touchValue > 1)                   // if the key is pressed
    {
        tone(speaker, D);                 // play the note D
        delay(100);                       // wait for 1/10th of a second
    }
    else                                  // if the key is not pressed
    {
         noTone(speaker);                 // stop playing the note
    }

    touchValue = readCapacitivePin(key3); // read the touch sensor value
    Serial.println(touchValue);           // send touchValue to computer
    delay(100);                           // delay for 1/10 of a second
    if (touchValue > 1)                   // if the key is pressed
    {
        tone(speaker, E);                 // play the note E
        delay(100);                       // wait for 1/10th of a second
    }
    else                                  // if the key is not pressed
    {
        noTone(speaker);                  // stop playing the note
    }

    ...

}
Notice how long and complicated this code is. And it’s just for three keys! Think about all of the places where you might make an error—miss a semicolon or a bracket, say. Yikes!
Don’t get too worried. Instead of creating this tangled and extensive program, you can leverage the power of procedures again. By writing a procedure for the basic code block, you can use the same code multiple times without rewriting it. You can call the procedure in loop instead of retyping (or copying and pasting) the same block of code over and over.
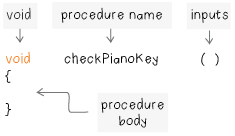
The basic format for defining a procedure is shown below. The definition begins with the word void. This is followed by the name of the procedure, in this case checkPianoKey. Inputs that the procedure requires are listed in the parentheses to the right of the procedure’s name. Since checkPianoKey doesn’t have any inputs yet, these parentheses are blank. Two curly brackets—an opening bracket at the beginning of the procedure and a closing bracket at the end—tell the computer which statements are part of the procedure.
Create a procedure called checkPianoKey and add it to the bottom of your program, immediately after the loop section.
void loop() {
    ...
}

void checkPianoKey()
{
}
Begin writing the body of the procedure by copying and pasting the code that is currently in your loop section into checkPianoKey, so that your code looks like the example below. Make sure that this code is between the two curly brackets. Compile the code to make sure it’s error free.
void checkPianoKey()
{
    touchValue = readCapacitivePin(key1); // read the touch sensor value
    Serial.println(touchValue);           // send touchValue to computer
    delay(100);                           // delay for 1/10 of a second
    if (touchValue > 1)                   // if the key is pressed
    {
        tone(speaker, C);                 // play the note C
        delay(100);                       // wait for 1/10th of a second
    }
    else                                  // if the key is not pressed
    {
        noTone(speaker);                  // stop playing the note
    }
}
You want the procedure to work for all of the keys, not just the first key, key1. You want to be able to tell the procedure which key it should check and play a note for. To do this, you need to add an input variable to your procedure. Call that variable key—a nice generic name. Add an input variable to the first line of your procedure. Remember that you need to specify the type of this input variable. In this case that type is int.
Next, change each occurrence of key1 in the body of the procedure to key so that the procedure will use the key input variable instead of always checking the first key, key1.
void checkPianoKey (int key)
{
    touchValue = readCapacitivePin(key); // read the touch sensor value
    Serial.println(touchValue);          // send touchValue to computer
    delay(100);                          // delay for 1/10 of a second
    if (touchValue > 1)                  // if the key is pressed
    {
        tone(speaker, C);                // play the note C
        delay(100);                      // wait for 1/10th of a second
    }
    else                                 // if the key is not pressed
    {
        noTone(speaker);                 // stop playing the note
    }
}
Adding an input variable to a procedure allows you to change the value of the variable in the procedure every time you use it. In this case, it allows you to call the procedure with a different key each time. As a result, you can use the same procedure to detect touch for every key.
To see how this works, edit the loop section of the program to make use of your new procedure. Because everything you were previously doing in the loop section is now in your procedure, you can replace all of the code in loop with one call to your procedure, using key1 as an input since that’s the key you’ve been using so far. Notice how neat and simple your loop section is now!
void loop() {
    checkPianoKey(key1);
}
Note: Though it’s not shown above, your checkPianoKey procedure should be at the bottom of your program, after the loop section. Meanwhile, the variable definitions and the setup sections are still in your program before the loop section.
Compile and upload this code to your LilyPad. Test it out. Your first key should work just as it did before. But, since you haven’t added checks for any of your new keys they won’t do anything yet.
Edit your code to add checks for each of your new keys. That is, call your checkPianoKey procedure once for each key, using that key’s variable name as an input to the procedure like the code below.
void loop() {
    checkPianoKey(key1);
    checkPianoKey(key2);
    checkPianoKey(key3);
    checkPianoKey(key4);
    checkPianoKey(key5);
    checkPianoKey(key6);
    checkPianoKey(key7);
}
Compile your code and upload it to your LilyPad. Try touching each of your keys. Does each one work? That is, does touching each key produce a sound? Does touching different keys produce different sounds? If your code looks like the code here, you’ve built a one note piano.
To fix the problem, first find where you produce sound in your code. The only place where you use the tone procedure to produce sound is in the checkPianoKey procedure. If you look at this line of code—tone(speaker, C);—you can see that it always produces the same sound; it always plays a C note. This is the heart of the problem.
You want the procedure to produce different sounds for different keys. You need to add a second input variable to the checkPianoKey procedure, one that specifies the note that you want the procedure to play. Call this second variable note. Change the procedure so that tone plays the variable note instead of always playing a C note.
void checkPianoKey (int key, int note)
{
    touchValue = readCapacitivePin(key); // read the touch sensor value
    Serial.println(touchValue);          // send touchValue to computer
    delay(100);                          // delay for 1/10 of a second
    if (touchValue > 1)                  // if the key is pressed
    {
        tone(speaker, note);             // play a note
        delay(100);                      // wait for 1/10th of a second
    }
    else                                 // if the key is not pressed
    {
        noTone(speaker);                 // stop playing the note
    }
}
Then, in the loop section of your code, you can include the notes that you want to play as part of your procedure calls. For each line, add a comma after your key variable and add the name of the note you want that key to play.
void loop() {
    checkPianoKey(key1, C);
    checkPianoKey(key2, D);
    checkPianoKey(key3, E);
    checkPianoKey(key4, G);
    checkPianoKey(key5, A);
    checkPianoKey(key6, C1);
    checkPianoKey(key7, D1);
}
Notice how adding input variables to a procedure allows you to make it much more versatile. Notice also how short and elegant your program is now. Compare it to the alarming tangle you would have had without the checkPianoKey procedure (shown on page xx). Procedures are amazing!
Compile your code, upload it to your LilyPad, and try out your keys. The code the example above plays the notes of a pentatonic (five-note) scale. This scale has the nice property of sounding melodic no matter what you play.
MAKE YOUR PIANO FASTER
Hold down one piano key continuously for awhile. What happens? Notice how the note turns on and then turns off before turning back on. Now play a bit with your piano. You may also notice that, in general, you have to hold your finger down on a key awhile before it plays a note—try playing your piano now and pay attention to the way you need to wait between key presses.
To make your piano more responsive, you can eliminate some of the delays in your program. Look at your checkPianoKey procedure. It has two delays, highlighted below.
void checkPianoKey (int key, int note)
{
    touchValue = readCapacitivePin(key);    // read the touch sensor value
    Serial.println(touchValue);             // send touchValue to computer
    delay(100);                             // delay for 1/10 of a second
    if (touchValue > 1)                     // if the key is pressed
    {
        tone(speaker, note);                // play a note
        delay(100);                         // wait for 1/10th of a second
    }
    else                                    // if the key is not pressed
    {
        noTone(speaker);                    // stop playing the note
    }
}
The first delay was put in originally to make sure you didn’t overload the computer with too much data from the Serial.println statement that precedes it. The second delay tells the piano to play a note for 1/10th of a second before moving on. This second delay is important. You want to make sure that a note plays for awhile after you press a key, but you might be able to shorten or eliminate the first delay.
You don’t need to delay each time the checkPianoKey procedure is called. That is, you don’t need to delay the program each time you check a key. However, you do need a delay somewhere to make sure that your computer doesn’t get overloaded with information from the Serial.println statements.
To shorten the total amount of delay while still making sure that you don’t overload the computer, replace the first delay in the checkPianoKey procedure with a delay in the loop section. This way, instead of delaying for 700ms (7/10ths of a second, almost one full second) each time loop runs—once for each key you check—the program will only delay for 100ms (1/10th of a second).
void loop() { checkPianoKey(key1, C); checkPianoKey(key2, D); checkPianoKey(key3, E); checkPianoKey(key4, G); checkPianoKey(key5, A); checkPianoKey(key6, C1); checkPianoKey(key7, D1); delay(100); } void checkPianoKey(int key, int note) { touchValue = readCapacitivePin(key); // read touch sensor value Serial.print(touchValue); // send touchValue to the computerdelay(100); // delay for 1/10 of a secondif (touchValue > 1) // if the key is pressed { tone(speaker, note); // play a note delay(100); // wait for 1/10th of a second } else // if the key is not pressed { noTone(speaker); // stop playing the note } }
Make this change to your code and compile and upload it to your LilyPad. Try playing your piano and notice how it’s much more responsive than it was. If you hold down one key continuously, you’ll notice that the note still turns on and off, but the delay between notes is much shorter.
Can you figure out why the note turns on and off even when you’re holding the key down continuously? Note: Fixing this problem completely is somewhat challenging and this tutorial isn’t going to describe the solution, but it’s good to understand why things work the way they do. Hint: The problem is related to the delays in the program and the fact that noTone(speaker); turns all sounds off—not just the sound for a particular key. If you’re feeling motivated and curious, check out the Arduino documentation on the delay procedure http://arduino.cc/en/Reference/delay and see if you can find a solution to the problem using the information you find there.
You can also think of the behavior not as a problem, but as a feature of the instrument you’ve just built. The on/off behavior makes your piano sound interesting. Even if you could easily eliminate it, you might want to keep it. As the famous saying goes…“It’s a feature not a bug!”
If your piano is behaving erratically or unexpectedly, see the troubleshooting section. Otherwise, save your program and go on to the next section. Your code should now look more or less like the below.
// sensor keys
int key1 = 6;
int key2 = 9;
int key3 = 10;
int key4 = 11;
int key5 = A2;
int key6 = A3;
int key7 = A4;
int speaker = 5;                 // name of the speaker key
int touchValue;                  // will store sensor readings

//musical notes
int C = 1046;
int D = 1175;
int E = 1319;
int F = 1397;
int G = 1598;
int A = 1760;
int B = 1976;
int C1 = 2093;
int D1 = 2349;

void setup() {
    // set all keys to be inputs
    pinMode(key1, INPUT);
    pinMode(key2, INPUT);
    pinMode(key3, INPUT);
    pinMode(key4, INPUT);
    pinMode(key5, INPUT);
    pinMode(key6, INPUT);
    pinMode(key7, INPUT);
    pinMode(speaker, OUTPUT);   // set speaker to be an output
    Serial.begin(9600);         // initialize the communication
}

void loop() {
    checkPianoKey(key1, C);
    checkPianoKey(key2, D);
    checkPianoKey(key3, E);
    checkPianoKey(key4, G);
    checkPianoKey(key5, A);
    checkPianoKey(key6, C1);
    checkPianoKey(key7, D1);
    delay(100);
}

void checkPianoKey (int key, int note)
{
    touchValue = readCapacitivePin(key); // read the touch sensor value
    Serial.println(touchValue);          // send touchValue to computer
    if (touchValue > 1)                  // if the key is pressed
    {
        tone(speaker, note);             // play a note
        delay(100);                      // wait for 1/10th of a second
    }
    else                                 // if the key is not pressed
    {
        noTone(speaker);                 // stop playing the note
    }
}