DESIGN YOUR BOOKMARK
CHECK OUT YOUR ELECTRONIC PIECES
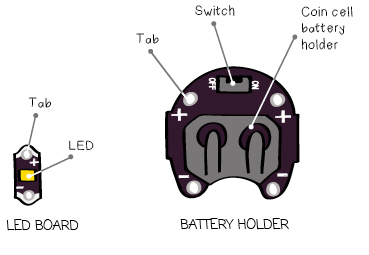
Get out your LED (short for “Light Emitting Diode”) board and battery holder and look at them closely. The battery holder has four silver-rimmed holes, called tabs, that can be sewn through. Next to each tab is a (+) or (–). The two (+) tabs are connected to the (+) side of the battery that slides into the holder and the two (–) tabs are connected to the (–) side of this battery. The LED board also has two tabs labeled (+) and (–). These are connected to the (+) and (–) sides of the LED.
WASHING ELECTRONICS
All of the pieces, except the coin cell battery, are washable. If your project gets grungy, take your battery out of its holder and then wash the project in cold water with a mild detergent.
DESIGN OVERVIEW
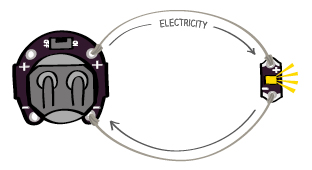
You’re going to stitch together a circuit with your pieces that looks like the drawing below. The LED will glow when electricity flows from the (+) side of the battery, through the conductive thread, through the LED and back to the (–) side of the battery.
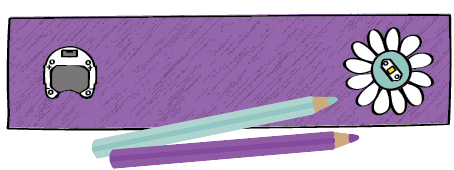
BOOKMARK DESIGN
Decide on a size and shape for your bookmark and draw its outline on a piece of paper. It should be at least 2” (5cm) wide so that your battery holder fits on it easily. Cut out this outline. You’ll use it as a template for cutting out your fabric later.
On a second piece of paper, use your template to draw a new bookmark outline. Put your template aside.
Decide on a color scheme and a decorative theme for your bookmark and add these details to your sketch. Figure out where you want your battery holder and LED to be. Draw these on the sketch too.
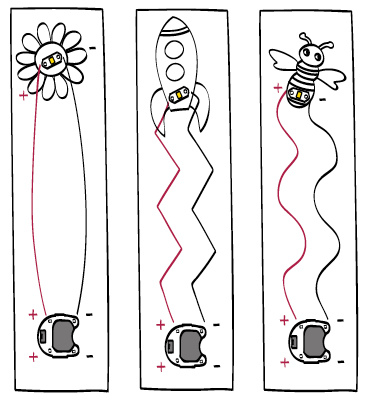
Plan out the conductive thread connections between the components. In electronics terminology, each of these connections is called a trace. In your circuit, there are two traces: the (+) trace that connects the (+) side of the battery holder to the (+) side of the LED and the (-) trace that connects the (–) tabs of the battery holder and LED.
CIRCUIT DESIGN
Below are a few design examples. (The rest of this tutorial will use the first one.) Notice how the (+) traces are drawn in red and the (-) traces are drawn in black. These are the traditional colors used to indicate (+) and (-) in electronics. Use your colored pencils to draw the electrical connections on your design sketch.
THINGS TO KEEP IN MIND WHEN YOU DESIGN CIRCUITS
* It’s important to connect a (+) tab on the battery holder to the (+) side of the LED, and a (-) tab on the battery to the (-) side of the LED. If you connect your LED backwards it won’t light up. LEDs and batteries have what’s called polarity. This means that the (+) and (-) sides are different and they need to be connected in the correct orientation for a circuit to function.
* If the (+) and (-) traces touch each other this creates what is called a short circuit. (You’ll learn more about this momentarily.) Short circuits will drain your battery and prevent your LED from turning on. You want to keep the (+) and (-) traces as far away from each other as possible.
* Traces can form part of your decoration. They can be curvy or square, zig-zags, loop-d-loops, or straight lines. Alternatively, they can be covered by decorations.