BEGIN BUILDING
CUT OUT YOUR FABRIC
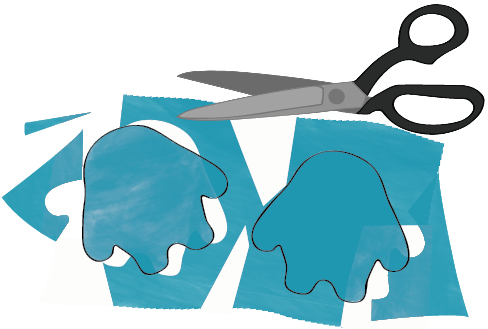
First, you need to cut out your fabric. Trace your template onto a piece of fabric with a piece of chalk or marker. Make two copies of the monster shape and cut out both pieces—one for the front and one for the back of the monster.
ATTACH YOUR COMPONENTS
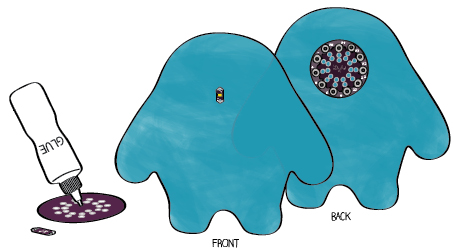
Using your design sketch as a guide, glue your Protoboard and LED onto the fabric by putting a dab of glue on the backside of each component. Use only as much glue as you need to attach the pieces and be careful not to fill any of their holes since you’ll need to stitch through them soon.
SEW ONE SIDE TOGETHER
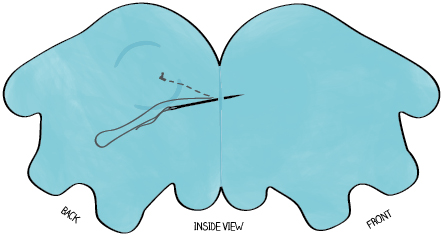
Using embroidery thread (or any other non-conductive thread), sew one side of your monster together. This will enable you to easily stitch from the front to the back of the monster with your conductive thread.
Make sure that you keep all of your components on the side of the fabric that will become the outside of your monster. Your monster should look like the drawing on the top of the next page when you’re done.

DRAW YOUR CONNECTIONS
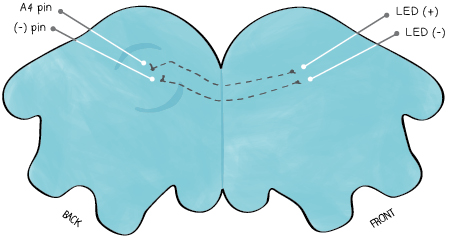
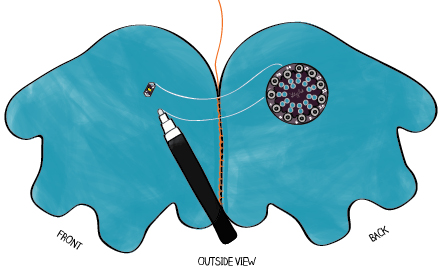
Using chalk or a pencil, draw the electrical connections between the LED and Protoboard. These will cross the seam you just sewed.
If you want to hide your stitches on the inside of your monster, draw these lines on the inside where you’ll be able to follow them. Also see the note at bottom of this page about these marks.
SEW YOUR LED
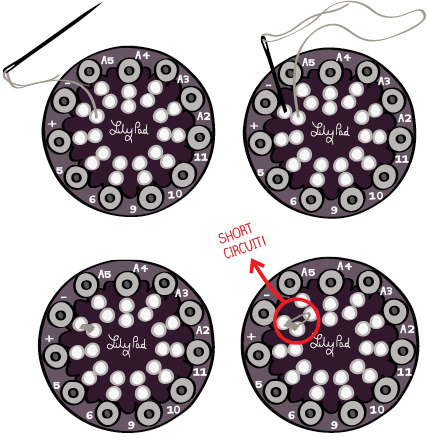
Now you’re ready to begin stitching the LED to the LilyPad Protoboard. Measure out 2-3’ (1 meter) of conductive thread and thread your needle. Tie a knot on the underside of your fabric near the (-) holes on the Protoboard using the knot tying technique described in the bookmark tutorial.
Sew tightly through the (-) holes at least three times to attach the Protoboard to the fabric and make a solid electrical connection between the Protoboard and your thread.
Don’t let the conductive thread touch any of the other holes on the Protoboard. This would create a short circuit.
Note: If you want, you can be careful to sew your conductive stitches only on the inside of the monster. This will mean that these stitches will not show up on the monster’s outside. The drawings in this tutorial show all conductive stitches sewn this way. However, you can also sew all the way through the fabric so that the stitches show up on both sides. Either stitching technique will work well.
Continue sewing from the Protoboard to the (-) side of the LED, following the connections that you drew on the fabric. You should use a running stitch, a simple stitch that is described in the bookmark tutorial. Sew across the seam you just stitched together with embroidery thread. Note: The drawings below now show an inside (flipped over) view of the monster.
When you reach the LED, sew at least 3 loops through the hole on the (-) side of the LED. Then, pull your thread tight and tie a knot on the inside of the monster. (You don’t want an ugly knot on the outside!)
Cut the tails of the knots on both ends of your trace to about ¼” (6mm) long. Put a dab of glue on both of them to keep them from unravelling.

Now sew the (+) side of your LED to the correct pin on the Protoboard (A4, or the pin that you chose). Here’s an inside view of the monster with both the (+) and (-) LED connections stitched in.