MAKE YOUR MONSTER BLINK
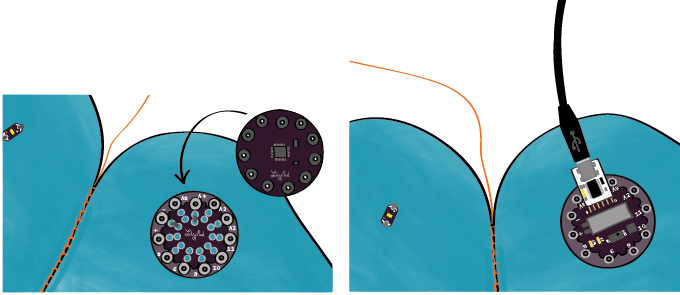
Snap the LilyPad onto the Protoboard on your monster. Get out your computer, open up the Arduino software,and attach your LilyPad to your computer via the USB cable and the FTDI board.
In the Arduino software, open up the “Blink” example (under File → Examples → 01.Basics → Blink). Then, copy and paste the following example code into your Arduino window, replacing all of the code in your window with the code below:
/*
 Blink
 Turns on an LED for one second, then off for one second, repeatedly.

 This example code is in the public domain.
*/

// Pin 13 has an LED connected on most Arduino boards.
// give it a name:
int led = 13;    // set the variable “led” to the value 13

// the setup routine runs once when you press reset:
void setup() <{
    // initialize the digital pin as an output.
    pinMode(led, OUTPUT);
}

void loop() {
    digitalWrite(led, HIGH);  // turn the LED on
    delay(1000);              // wait for a second
    digitalWrite(led, LOW);   // turn the LED off
    delay(1000);              // wait for a second
}
Click on the check mark button in the Toolbar to compile the code. A “Done compiling” message should appear in the Status Bar. If you receive an error message instead, make sure your code matches the code above exactly. Continue to edit and compile until you receive a “Done compiling” message.
Delete all of the comments at the beginning of your program— all of the comments before the int led = 13; statement. This will make it easier to follow along with the examples. Compile and upload this example to your LilyPad. A green LED on the LilyPad should begin to blink on and off.
You want to use this program to control the LED you’ve stitched into your monster, not the LED on the LilyPad. To do this you’ll need to make a small edit. Notice that at the beginning of the code, the variable led is set to the value 13 with the line int led = 13;. This tells the LilyPad which pin on the LilyPad the LED is attached to. When the variable led is set to 13, the code in the rest of the program will control the green LED that is on the LilyPad board.
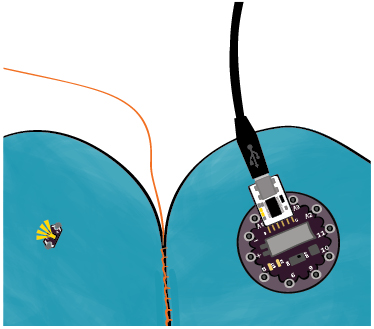
To get your monster’s LED to blink, you should change 13 to the pin your LED is sewn to (A4 here). Make this change to the code and compile and upload it to your LilyPad. The LED you’ve sewn to your monster should begin to blink.
At this point, also delete unnecessary comments from the example code, as is shown below. Again, this will make it easier to follow along with this book’s examples.
int led = A4;// the setup routine runs once when you press reset:void setup() {// initialize the digital pin as an output.pinMode(led, OUTPUT); }// the loop routine runs over and over again forever:void loop() { digitalWrite(led, HIGH); // turn the LED on delay(1000); // wait for a second digitalWrite(led, LOW); // turn the LED off delay(1000); // wait for a second }
PINMODE
There is one line in the setup section: pinMode(led, OUTPUT);. This line tells the LilyPad that the led pin (pin A4 for your program) will be used to control an output device and should be in output mode. Outputs are things like lights, and motors that do things to the world. Input devices, which this tutorial will describe in a few pages, are things like switches and sensors that gather information about the world.
void setup() {
    pinMode(led, OUTPUT);
}
Whenever you add a component to your design you need to include a pinMode statement in the setup part of your program to tell the LilyPad whether the pin the component is attached to should be in either input or output mode. (You’ll do this shortly, when you connect your speaker to your Protoboard and begin programming it.)
pinMode is a procedure that is part of the Arduino programming language. The procedure pinMode takes two input variables or “inputs”: one specifies the pin that is being controlled and one specifies whether that pin will be an input or an output.

DIGITALWRITE
Now examine the statements in the loop section of your program. Remember from the programming tutorial that the loop section is where the main action of your program takes place.
void loop() {
    digitalWrite(led, HIGH);             // turn the LED on
    delay(1000);                              // wait for a second
    digitalWrite(led, LOW);             // turn the LED off
    delay(1000);                              // wait for a second
}
There are four statements in the loop section. The first one is:
digitalWrite(led, HIGH); // turn the LED on
digitalWrite is another Arduino procedure. It is what turns your LED on and off. It takes two inputs, one that specifies which pin is being controlled and another that tells the Lily- Pad what to write or send to the pin. This statement sets a pin to either HIGH or LOW. This means that the pin, after this statement executes, will electrically be either HIGH or LOW.

HIGH AND LOW
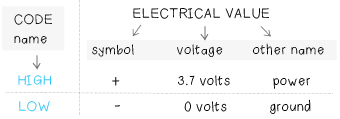
What do HIGH and LOW mean? These are code words that the Arduino language uses to talk about electricity. When the Lily-Pad encounters a digitalWrite(pin, HIGH); statement in the program, it sets the pin to (+). This statement tells the microcontroller on the LilyPad to close a microscopic switch that you can’t see between (+) and the specified pin (remember the sparkling bracelet tutorial). When the LilyPad encounters a digitalWrite(pin, LOW); statement in the program, it sets the pin to (-) and the microcontroller closes a tiny switch between (-) and the specified pin. These digitalWrite statements are what allow you to control electrical signals with code. It’s worth stopping to think about how powerful this is. The LilyPad and the Arduino turn text that you write on your computer into behavior that happens in the real world!
A summary of how the code that you write relates to real-world electricity is shown below. (Note: 3.7 volts is the voltage of the LilyPad’s built-in rechargeable battery.)
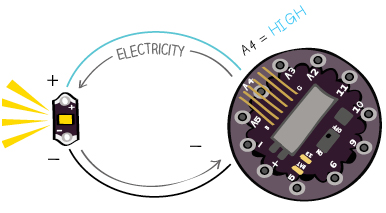
When you set the led pin (A4) HIGH with the statement digitalWrite(led, HIGH);, pin A4 gets set to (+). Since electricity flows from (+) to (-), current runs through the LED, lighting it up.
When you set the led pin (A4) LOW with the statement digitalWrite(led, LOW);, pin A4 gets set to (-). Since electricity does not flow from (-) to (-), the flow of electricity stops and the LED turns off.
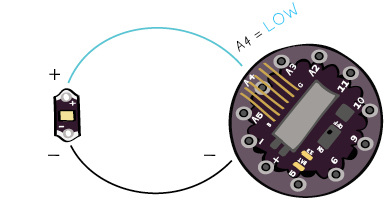
DELAY
delay is another procedure that you’ll use all the time. It takes only one input—an amount of time in milliseconds (1/1000 second). The delay statement tells the LilyPad to stop and do nothing for the specified amount of time.
For example, the statement delay(1000); tells the LilyPad to do nothing for 1000 milliseconds, which is 1 second.
EXPERIMENT
Now that you’re more familiar with the code, change the program to get a blinking behavior that you like for your monster.
Can you get your LED to flicker like a candle? Or thump like a heartbeat? You might also want to try using one of the LED behaviors you explored in the programming tutorial.
When you’re finished, your loop section it should look something like the code below.
void loop() {
    digitalWrite(led, HIGH);
    delay(100);
    digitalWrite(led, LOW);
    delay(100);
    digitalWrite(led, HIGH);
    delay(500);
    digitalWrite(led, LOW);
    delay(500);
}
CREATE YOUR OWN PROCEDURE
So far you’ve used built-in procedures like digitalWrite and delay. Now you’re going to write your own procedure. This new procedure will make your monster blink in the custom pattern you just created. A procedure is a chunk of code that is given its own special name. You’re going to create a procedure called blinkPattern that will store the blink code you just wrote.
This is the basic template for a procedure definition.
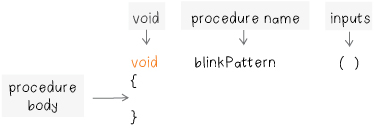
The definition begins with the word void followed by the name of the procedure. Any inputs taken by the procedure are listed in the parentheses to the right of the procedure’s name. Since blinkPattern doesn’t have any inputs, the parentheses are empty. Two curly brackets surround the “body”—the main part—of the procedure. These brackets tell the computer which statements are part of the procedure.
To create a procedure called blinkPattern, add the code below to the very end of your program, after the closing bracket of the loop section.
void blinkPattern()
{

}
Note: The name of the procedure doesn’t matter to the compiler, so if you’d like to pick a different name for your procedure you can. Just make sure that you replace blinkPattern with the name of your procedure everywhere that it appears in the examples from here on out. Here, for example, is a procedure named myVerySuperSpecialBlinkyPattern:
void myVerySuperSpecialBlinkyPattern()
{

}
Try compiling and uploading the new code to make sure the basic procedure definition doesn’t have any errors.
Next, copy the code from loop that defines your blink pattern and paste it into the body of your new blinkPattern procedure. Try compiling and uploading this code to make sure you haven’t introduced any errors.
void blinkPattern() {
    digitalWrite(led, HIGH);
    delay(100);
    digitalWrite(led, LOW);
    delay(100);
    digitalWrite(led, HIGH);
    delay(500);
    digitalWrite(led, LOW);
    delay(500);
}
Now, you need to use the name of the procedure, blinkPattern, somewhere else in the program to actually use the procedure. In programming slang this is known as calling a procedure. Edit your code so that it looks like the example below. Compile and upload this code. The behavior of your monster should be the same as it was.
int led = A4;

void setup() {
    pinMode(led, OUTPUT);
}

void loop() {
    blinkPattern();
}

void blinkPattern()
{
    digitalWrite(led, HIGH);
    delay(100);
    digitalWrite(led, LOW);
    delay(100);
    digitalWrite(led, HIGH);
    delay(500);
    digitalWrite(led, LOW);
    delay(500);
}
Notice how you use the same format to call blinkPattern that you’ve used to call other procedures. Since blinkPattern doesn’t have any inputs, the parentheses after its name are empty:

You’ll experience how useful your procedure is in a moment when your code starts to get more complex. For now, can you think of reasons why the ability to write procedures might be powerful? How might you use procedures to avoid repeating lines of code? Why might they make your programs easier to read? Why might they make your programs shorter?
SAVE YOUR CODE
Save your code by clicking on the downward pointing arrow in the Toolbar.

Click “OK” on the popup window that appears and choose a good name like “monster” for your file. Click on the “Save” button in the next window that appears to finish the process.
