BASIC PROGRAMMING STEPS
Now you’re ready to start programming! There are four steps to writing a program and running it on your LilyPad: 1. Write the program 2. Compile the program 3. Upload the program to the LilyPad 4. Run the program on the LilyPad.
WRITE THE PROGRAM
You’ll begin by trying out pre-written example code that is included in the Arduino software. “Write” is a slightly inaccurate description for the moment, but don’t worry, you’ll be writing your own programs soon.
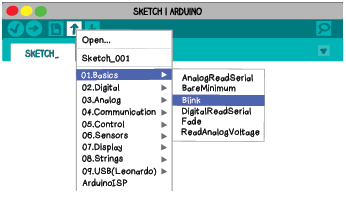
Click on the upward pointing arrow in the Toolbar to open Arduino’s built-in library of examples. Select 01.Basics → Blink. You can also get a new window with this code by going to the File menu and selecting Examples → 01.Basics → Blink.
The example program you opened should look kind of like the one below. Note: the example code in Arduino has changed a bit since the Sew Electric book was written, so your window will look slightly different.
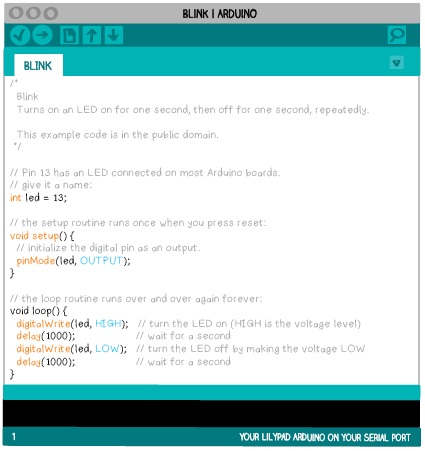
This program is written in a programming language called C. The Arduino software only understands programs written in C, so you’ll be learning how to write C programs. Assume for a moment that you’ve written this program. The next step is to compile it.
As was mentioned above, your program will probably look slightly different. In particular, the areas of grey text (the comments) in your code may be different. Don’t worry, your program will work the same way that the example program does.
COMPILE THE PROGRAM
When a program is compiled it is translated from the code that you wrote into a new code called hex code that the LilyPad can understand. The hex code is a very condensed form of the code that you wrote—essentially it is a long string of numbers. An excerpt of hex code is shown below.
:1038D00040E350E0225330404040504057FFFACF81
:1038E000962F9F5F692F981728F3909309020895E8
:1038F000982F8091C00085FFFCCF9093C60008955B
:10390000EF92FF920F931F93EE24FF248701809183
:10391000C00087FD17C00894E11CF11C011D111D9A
As you can see, hex code is pretty hard to understand and would be even harder to write! This is why you write C code instead of hex code. If you’ve made any mistakes in your C code, they will be detected during the compiling phase and you will have to correct them before your code will compile. Only perfectly formatted and punctuated and grammatically correct C code—code with perfect syntax will compile into hex code. To compile your Blink program, click on the checkmark button in the Toolbar. When you scroll over this button you should see the word “Verify”.

A progress bar that shows how long the compiling process will take will appear in the Status Bar.

If there are no errors in your program, your compilation will be successful and a “Done compiling.” message will appear in the Status Bar. The Feedback Area will display a message that tells you the size of your compiled program.

If there are errors in your program—if your C code is formatted incorrectly for instance—your compilation will fail. In this case, the Status Bar will turn orange and a confusing compile error message will appear. You will also get a more detailed and equally confusing error message in the Feedback Area.

Most of the error messages that appear in the Status Bar and Feedback Area will be perplexing. They are the computer’s way of telling you what’s wrong. Don’t worry if you don’t understand them, but you might be able to get some hints about the error in your program by reading them carefully. As you get more familiar with them they’ll become (slightly) more helpful.
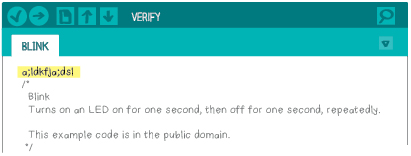
Try editing your program to introduce an error. Add a new line of random text to the top of the code. Click the compile button to see what happens. Most likely the error message that appears will be meaningless to you. If you can make sense of it, you are a programming prodigy!
But, Arduino does do one very useful thing when it detects an error. It highlights the line where the error was detected or moves the cursor near where the error was detected.
This can be a good clue about where the problem that you need to correct is located. Keep this in mind as you write and debug your own programs.
Remove the extra line you added and recompile your program before moving on to the next step.
UPLOAD THE PROGRAM TO THE LILYPAD
Once your program has compiled and hex code has been generated, the next step is to upload the hex code onto your LilyPad. To upload the compiled code, click on the rightward pointing arrow button in Toolbar. When you scroll over this button you’ll see the word “Upload.”

After you click it, you’ll see messages in the Status Bar telling you that the program is being compiled and then uploaded. If the upload is successful, you’ll see a “Done uploading” message in the Status Bar. A message in the Feedback Area will tell you the size of your uploaded program and the amount of memory available on the LilyPad.

If you have not set up your LilyPad properly, the upload process will fail. The Status Bar will turn orange and an error message will appear. If you receive an error like this, return to the setup section of this tutorial and make sure that you have completed all of the necessary setup steps including selecting the appropriate Serial Port and board in the Arduino software. If you are still having problems, see the troubleshooting chart at the end of this chapter.

RUN THE PROGRAM ON THE LILYPAD
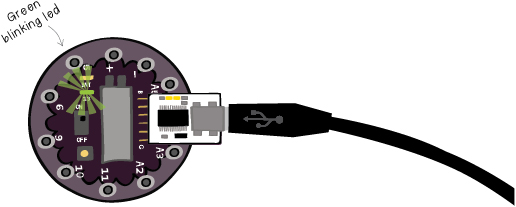
Look at your LilyPad. It should be blinking!
After the Blink program is uploaded, a green LED on the LilyPad should start to flash on and off. It’ll turn on, wait a second, turn off, wait a second, and continue doing this until the LilyPad is turned off or reprogrammed.
Try unplugging the LilyPad from your FTDI board. Flip the on/off swith on the LilyPad to off. The LilyPad should stop blinking. Now, flip the on/off switch on. The LilyPad should begin flashing again.

When you upload a program to the LilyPad, that program is stored in the LilyPad’s memory. This means the LilyPad can run the program independently of the computer. Once you’ve uploaded a program to the LilyPad, you can unplug the LilyPad from the computer and it will remember exactly what you told it to do!
Attach your LilyPad to your computer again so that you can keep programming.